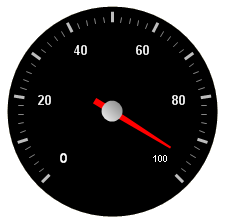
A needle marker is displayed as a pointer that points to a specific value on a scale.
The next step after adding a needle marker to your gauge is to Add a Range to a Gauge.
You can add a needle marker to your gauge:
When you save and run your application after completing the following steps, your gauge should look similar to the gauge below.

To add a needle marker to an existing Radial gauge using the Gauge Designer:
In the Gauge Explorer, expand Markers.
Click Add Marker… and select New Needle.
In the Properties panel, click the Needle Marker Layout tab. In the Widths and Extents pane, set the following properties:
Widths
Start — 3
Mid — 3
End — 1
Extents
Start — -20
Mid — 0
End — 65
In the Value and Units pane of the Needle Marker Layout tab, set the following properties:
Value — 95.00
Precision — 1.00
Units — Percent
Click the Appearance tab. In the Brush pane, set the following properties:
Type — Solid
Color — 255, 61, 22
In the Gauge Explorer, select Anchor.
In the Brush pane of the Appearance tab of the Properties panel set the following properties:
Type — SimpleGradient
Start Color — Gainsboro
End Color — 64, 64, 64
Gradient Style — BackwardDiagonal
In the Stroke pane of the Appearance tab, set the following properties:
Type — RadialGradient
SurroundColor — Gray
CenterColor — WhiteSmoke
FocusScale — 0,0
CenterPoint — 75, 25
To add a needle marker to an existing Radial gauge at design time:
Within the Gauges collection editor, click the Radial Gauge.
Locate the Scales property and click the Ellipsis (…) to launch the Scales collection editor.
Locate the Markers property and click the Ellipsis (…) to launch the Markers collection editor.
Click the Add button and select Add Needle.
Locate the BrushElement property. From the BrushElement drop-down list, select Solid Fill. This will create a new Solid Fill brush element.
Expand the newly created BrushElement property and locate the Color property. Set the color to Red.
Locate and expand the Anchor property and click on its BrushElement property.
From the BrushElement drop-down list, select SimpleGradient and set the following properties:
Type — SimpleGradient
StartColor — Gainsboro
EndColor — 64, 64, 64
GradientStyle — BackwardDiagonal
Set the Value property to 95
To add a needle maker to an existing Radial gauge at run time:
Add the following steps to the load event.
Create instances of the classes:
In Visual Basic:
Dim myNeedle As New RadialGaugeNeedle()
Dim mySolidFillBrushElement2 As New SolidFillBrushElement()
Dim mySimpleGradientBrushElement As New SimpleGradientBrushElement()
In C#:
RadialGaugeNeedle myNeedle = new RadialGaugeNeedle();
SolidFillBrushElement mySolidFillBrushElement2 = new SolidFillBrushElement();
SimpleGradientBrushElement mySimpleGradientBrushElement = _
  new SimpleGradientBrushElement();
Set the following color properties for the needle:
Type — Solid
Color — Red
In Visual Basic:
mySolidFillBrushElement2.Color = System.Drawing.Color.Red
myNeedle.BrushElement = mySolidFillBrushElement2
In C#:
mySolidFillBrushElement2.Color = System.Drawing.Color.Red;
myNeedle.BrushElement = mySolidFillBrushElement2;
Set the following property for the anchor:
Radius — 10
Measure — Percent
In Visual Basic:
myNeedle.Anchor.RadiusMeasure = _
  Infragistics.UltraGauge.Resources.Measure.Percent
myNeedle.Anchor.Radius = 10
In C#:
myNeedle.Anchor.RadiusMeasure =
  Infragistics.UltraGauge.Resources.Measure.Percent;
myNeedle.Anchor.Radius = 10;
Set the following color properties for the anchor:
Type — SimpleGradient
EndColor — WhiteSmoke
StartColor — Gray
GradientStyle — BackwardDiagonal
In Visual Basic:
myNeedle.Anchor.BrushElement = mySimpleGradientBrushElement
mySimpleGradientBrushElement.EndColor = System.Drawing.Color.WhiteSmoke
mySimpleGradientBrushElement.GradientStyle = _
  Infragistics.UltraGauge.Resources.Gradient.BackwardDiagonal
mySimpleGradientBrushElement.StartColor = System.Drawing.Color.Gray
In C#:
myNeedle.Anchor.BrushElement = mySimpleGradientBrushElement;
mySimpleGradientBrushElement.EndColor = System.Drawing.Color.WhiteSmoke;
mySimpleGradientBrushElement.GradientStyle =
  Infragistics.UltraGauge.Resources.Gradient.BackwardDiagonal;
mySimpleGradientBrushElement.StartColor = System.Drawing.Color.Gray;
Set the following properties:
AllowDrag — true
EndExtent — 65
EndWidth — 1
MidExtent — 0
MidWidth — 3
Precision — 1
StartExtent — -20
StartWidth — 3
Value — 95
WidthMeasure — Percent
In Visual Basic:
myNeedle.AllowDrag = True
myNeedle.EndExtent = 65
myNeedle.EndWidth = 1
myNeedle.MidExtent = 0
myNeedle.MidWidth = 3
myNeedle.Precision = 1
myNeedle.StartExtent = -20
myNeedle.StartWidth = 3
myNeedle.Value = 95
myNeedle.WidthMeasure = Measure.Percent
In C#:
myNeedle.AllowDrag = true;
myNeedle.EndExtent = 65;
myNeedle.EndWidth = 1;
myNeedle.MidExtent = 0;
myNeedle.MidWidth = 3;
myNeedle.Precision = 1;
myNeedle.StartExtent = -20;
myNeedle.StartWidth = 3;
myNeedle.Value = 95;
myNeedle.WidthMeasure = Measure.Percent;
Add the needle marker to the Markers collection:
In Visual Basic:
myScale.Markers.Add(myNeedle)
In C#:
myScale.Markers.Add(myNeedle)