
If you want a property of your gauge to start with one color and fade into another color in a specific way, apply the Simple Gradient brush element to the property.
To apply the Simple Gradient brush element to a property of your gauge using the Gauge Designer:
In the Gauge Explorer or the interactive preview area, select the property to which you want to apply the Simple Gradient brush element.
In the Appearance tab of the Properties panel, select SimpleGradient from the Type drop-down list.
Click the Details drop-down arrow.
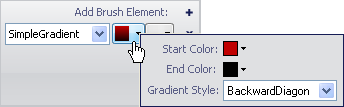
In the Gradient Editor, set the following properties:
Start Color - Click the drop-down arrow. The color picker appears. On the left-hand side, click Web, then select the Firebrick color.
End Color - Click the drop-down arrow. The color picker appears. On the left-hand side, click Web, then select the Black color.
Gradient Style - From the drop-down list, select Backward Diagonal.
When you are finished specifying the properties, click anywhere in the Brush pane.
Click the Relative Bounds editor drop-down arrow.
In the Relative Bounds pane that appears, set the following properties:
X - 3
Y - 3
Width - 94
Height - 94
In the Relative Clip Bounds pane that appears, set the following properties:
X - 0
Y - 0
Width - 0
Height - 0

You can see the Simple Gradient brush element applied to the selected property of your gauge in the interactive preview area.