
You can add xamOutlookBar™ to a Window using the same pattern as any control found in Microsoft® Windows® Presentation Foundation. This pattern involves using a layout container as the main content of the Window and then adding the control to the Children collection of the layout container. It is important to name the layout container in XAML so that you can reference it from the code-behind.
You will add xamOutlookBar to a Window using procedural code or XAML.
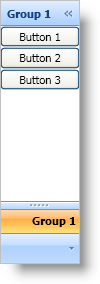
When you run the finished project, you should see a xamOutlookBar control in your Window that looks similar to the screen shot below.
Create a Microsoft® Windows® Presentation Foundation Window project.
Add the following NuGet package reference to your application:
Infragistics.WPF.OutlookBar
For more information on setting up the NuGet feed and adding NuGet packages, you can take a look at the following documentation: NuGet Feeds.
Add an XML namespace declaration for xamOutlookBar inside the opening Window tag in XAML. In code-behind you will need using/Imports directives so you don’t have to type out a member’s fully qualified name.
In XAML:
xmlns:igOutlookBar="http://infragistics.com/OutlookBar"In Visual Basic:
Imports Infragistics.Windows.OutlookBarIn C#:
using Infragistics.Windows.OutlookBar;Name the default Grid layout panel in the Window so that you can reference it in the code-behind.
In XAML:
<Grid Name="layoutRoot">
</Grid>
Add an instance of xamOutlookBar to the layoutRoot Grid layout panel.
Name the instance of the xamOutlookBar control.
Set the HorizontalAlignment property to Left.
When you collapse xamOutlookBar’s navigation pane, the Grid layout panel will automatically center the navigation pane. This behavior may not be what you want if you are trying to emulate the navigation pane in Microsoft® Outlook®. In order to keep xamOutlookBar’s navigation pane attached to an edge of the Grid layout panel, you have to set its HorizontalAlignment property to Left or use a different layout panel such as a DockPanel layout container instead of the Grid layout container.
In XAML:
<igOutlookBar:XamOutlookBar Name="xamOutlookBar1" HorizontalAlignment="Left">
    <!-- TODO: Add OutlookBarGroup objects here -->
</igOutlookBar:XamOutlookBar>
Create an instance of the xamOutlookBar control in the Window constructor after the InitializeComponent method and add it to the Grid’s Children collection.
In Visual Basic:
Dim xamOutlookBar1 As New XamOutlookBar()
xamOutlookBar1.HorizontalAlignment = HorizontalAlignment.Left
Me.layoutRoot.Children.Add(xamOutlookBar1)
In C#:
XamOutlookBar xamOutlookBar1 = new XamOutlookBar();
xamOutlookBar1.HorizontalAlignment = HorizontalAlignment.Left;
this.layoutRoot.Children.Add(xamOutlookBar1);
Add an OutlookBarGroup object to xamOutlookBar’s Groups collection.
You do not have to explicitly declare tags for xamOutlookBar’s Groups collection.
Header property - Set this property to display a value in the header of the group.
Key property - Set this property to index into the Groups collection using a string value.
LargeImage property - Set this property to display an icon next to the group header.
SmallImage property - Set this property to display an icon for the group when it is in the overflow area. If you do not set this property, xamOutlookBar will display a default envelope icon when the group is in the overflow area.
In XAML:
<igOutlookBar:OutlookBarGroup
    Header="Group 1"
    Key="Group1"
    SmallImage="ReplaceWithYourImage1.jpg"
    LargeImage="ReplaceWithYourImage2.jpg">
    <!-- TODO: Add a layout panel here -->
</igOutlookBar:OutlookBarGroup>
In Visual Basic:
Dim group1 As New OutlookBarGroup()
group1.Header = "Group 1"
group1.Key = "Group1"
group1.LargeImage = New BitmapImage(New Uri("ReplaceWithYourImage1.jpg"))
group1.SmallImage = New BitmapImage(New Uri("ReplaceWithYourImage2.jpg"))
xamOutlookBar1.Groups.Add(group1)
In C#:
OutlookBarGroup group1 = new OutlookBarGroup();
group1.Header = "Group 1";
group1.Key = "Group1";
group1.LargeImage = new BitmapImage(new Uri("ReplaceWithYourImage1.jpg"));
group1.SmallImage = new BitmapImage(new Uri("ReplaceWithYourImage2.jpg"));
xamOutlookBar1.Groups.Add(group1);
Set the Content property of the OutlookBarGroup object to an instance of a StackPanel.
In XAML:
<StackPanel>
    <!-- TODO: Add controls here -->
</StackPanel>
In Visual Basic:
Dim panel1 As New StackPanel()
group1.Content = panel1
In C#:
StackPanel panel1 = new StackPanel();
group1.Content = panel1;
Add controls to the StackPanel. In this example, three Button controls will be added to the group.
In XAML:
<Button Content="Button 1" />
<Button Content="Button 2" />
<Button Content="Button 3" />
In Visual Basic:
For i As Integer = 1 To 3
    Dim btnExample As New Button()
    btnExample.Content = "Button " + i.ToString()
    panel1.Children.Add(btnExample)
Next
In C#:
for (int i = 1; i <=3; i++)
{
    Button btnExample = new Button();
    btnExample.Content = "Button " + i.ToString();
    panel1.Children.Add(btnExample);
}
Run the project.