
This topic is a step-by-step walkthrough on how to customize xamPivotGrid™ cells by applying custom DataTemplates for their content.
The following table lists the topics required as a prerequisite to understanding this topic.
This topic contains the following sections:
The procedure below will help you understand how to use the cell customization feature of the xamPivotGrid.
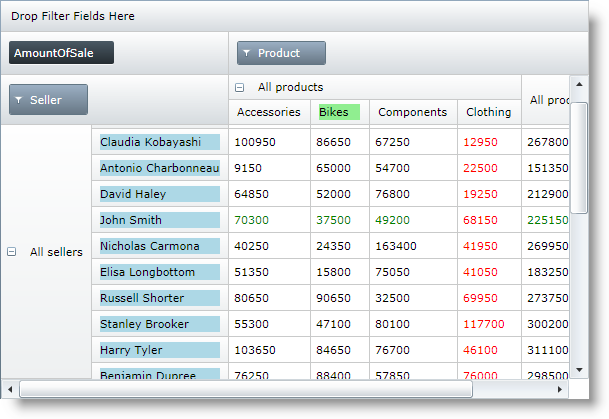
The following screenshot is a preview of the final result.
To complete the procedure, you need a WPF application where the xamPivotGrid control is used. In this example the Sales Data Sample data source is used, but you can modify the code examples to work with other data.
This topic takes you step-by-step toward creating and applying custom templates for xamPivotGrid data and header cells. The following is a conceptual overview of the process:
Create a set of DataTemplates.
First you need to create DataTemplates that you will later assign to the cell content. When these templates are used in the xamPivotGrid, the DataContext for data cells is a string containing the value that should be displayed in the cell. For header cells the data context is the Tuple for the respective row/column.
Therefore to get the value of the cell in the DataTemplate you need to do a simple data context binding: {Binding}
Add the data templates to the Resources section of your page or to another ResourceDictionary that is accessible from your page.
Apply templates for data cells.
Create a DataCellTemplate and add it to the xamPivotGrid’s DataCellTemplates collection.
In order to use a template from the ones created in step 1, you need add a DataCellTemplate object to the DataCellTemplates collection and set its Template property to the DataTemplate you want to apply.
You can specify as many DataCellTemplates as you wish.
Specify which cells the template should apply to.
This is achieved by setting values to the remaining properties of the DataCellTemplates.
Specify column and row hierarchy.
When you set the ColumnHierarchy property, the data template will be applied to all data cells that are in the specified column hierarchy. The value should be the same as the Caption property of the Hierarchy that you want to target. Analogically you can specify a value for the RowHierarchy property. This will apply the template to the cells that are in both the column and row hierarchies.
Specify column and row level.
Setting values to these properties enables you to create even more precise criteria defining where the data template will be applied. Setting the Level to an integer number will cause the template to be applied only to cells at that level. Level numbering starts at 1 (not at 0).
Specify column and row label.
Setting these properties will apply the template only to cells whose column/row header has the specified label. This enables you to apply custom DataTemplate to a specific cell.
Apply templates for row and column headers.
Create a HeaderTemplate and add it to the ColumnHeaderTemplates/ RowHeaderTemplates collection.
This is done analogically to the way the DataCellTemplates are added to the DataCellTemplates collection of the xamPivotGrid.
Specify the column/row header cells which the template will be applied to.
Specify the hierarchy.
Use the Hierarchy property to assign the template to all column/row header cells.
Specify the level.
Setting the Level property applies the template to cells at the specified level. As with DataCellTemplate, level numbering starts at 1.
Specify the label.
This way the template is applied only to header cells whose column/row Caption is the same as the one you specified.
The example below shows you how to create and apply custom DataTemplates to xamPivotGrid data and header cells.
Add DataTemplates to the Resources of the page.
In XAML:
<UserControl.Resources>
    <DataTemplate x:Key="DataTemplate1">
        <TextBlock Foreground="Red" Text="{Binding}" />
    </DataTemplate>
    <DataTemplate x:Key="DataTemplate2">
        <TextBlock Foreground="Green" Text="{Binding}" />
    </DataTemplate>
    <DataTemplate x:Key="DataTemplate3">
        <Grid Background="LightGreen">
            <TextBlock Text="{Binding}" />
        </Grid>
    </DataTemplate>
    <DataTemplate x:Key="DataTemplate4">
        <Grid Background="LightBlue">
            <TextBlock Text="{Binding}" />
        </Grid>
    </DataTemplate>
</UserControl.Resources>
Apply the DataTemplates.
In XAML:
<ig:XamPivotGrid
    x:Name="pivotGrid"
    DataSource="{StaticResource FlatDataSource}">
    <ig:XamPivotGrid.DataCellTemplates>
        <ig:DataCellTemplate
            Template="{StaticResource DataTemplate1}"
            ColumnHierarchy="Product"
            ColumnLabel="Clothing" />
        <ig:DataCellTemplate
            Template="{StaticResource DataTemplate2}"
            RowHierarchy="Seller"
            RowLevel="2"
            RowLabel="John Smith" />
    </ig:XamPivotGrid.DataCellTemplates>
    <ig:XamPivotGrid.ColumnHeaderTemplates>
        <ig:HeaderTemplate
            Template="{StaticResource DataTemplate3}"
            Label="Bikes" />
    </ig:XamPivotGrid.ColumnHeaderTemplates>
    <ig:XamPivotGrid.RowHeaderTemplates>
        <ig:HeaderTemplate
            Template="{StaticResource DataTemplate4}"
            Hierarchy="Seller"
            Level="2" />
    </ig:XamPivotGrid.RowHeaderTemplates>
</ig:XamPivotGrid>
In C#:
…
pivotGrid.DataCellTemplates.Add((DataCellTemplate)this.Resources["DataTemplate1"]);
pivotGrid.DataCellTemplates.Add((DataCellTemplate)this.Resources["DataTemplate2"]);
pivotGrid.ColumnHeaderTemplates.Add((HeaderTemplate)this.Resources["DataTemplate3"]);
pivotGrid.RowHeaderTemplates.Add((HeaderTemplate)this.Resources["DataTemplate4"]);
…
In Visual Basic:
…
pivotGrid.DataCellTemplates.Add(DirectCast(Me.Resources("DataTemplate1"), DataCellTemplate))
pivotGrid.DataCellTemplates.Add(DirectCast(Me.Resources("DataTemplate2"), DataCellTemplate))
pivotGrid.ColumnHeaderTemplates.Add(DirectCast(Me.Resources("DataTemplate3"), HeaderTemplate))
pivotGrid.RowHeaderTemplates.Add(DirectCast(Me.Resources("DataTemplate4"), HeaderTemplate))
…The following topics provide additional information related to this topic.