
WebDataMenu™ can be used to represent hierarchical data in a menu like structure. Hierarchical data can be offered by many sources such as Datasets, custom objects, xml files, and ObjectDataSource (just to name a few). The WebHierarchicalDataSource™ component can also be used to create and represent your hierarchical data model.
You will create a menu that displays your WebHierarchicalDataSource data. The WebHierarchicalDataSource control will be composed of 2 flat data sources.
In this topic, you will use the Categories and Products tables of the Northwind Access database to create a two level hierarchy linked by their respective CategoryID fields.
From the Visual Studio™ Toolbox, drag and drop a ScriptManager component, two AccessDataSource components, a WebHierarchicalDataSource component and a WebDataMenu control onto the Web Form. Name the AccessDataSource components as categoriesDataSource and productsDataSource.
In this step, the AccessDataSources are configured :
Click the categoriesDataSource component’s smart tag and select Configure Data Source. The Configure Data Source configuration wizard appears.
Click the Browse… button to open the Select Microsoft Access Database dialog. Select the Northwind database file (assuming that you have copied the access database file into your App_Data folder) and click OK.
Click Next to open the Configure the Select Statement dialog. Here you configure the Select statement such that you select all the columns from the Categories table.
Click Next and test your query by clicking Test Query button. Click Finish to close the Configure Data Source dialog.
Repeat the above procedure in order to configure the productsDataSource to select all the columns from the Products table.
Configure WebHierarchicalDataSource:
Click WebHeierarchicalDataSource component’s smart tag and select Edit Relations. The WebHierarchicalDataSource Designer appears.
Click Add View to select the available data sources. From the Data Source drop-down list select categoriesDataSource and click OK.
Click Add Child to create the next node level. Select the productsDataSource from the Child Data Source drop-down list.
Now add the relation between the two data sources by selecting the columns for the relationship.
Select CategoryID in the Parent Columns drop-down list.
Select CategoryID in the Child Columns drop-down list.
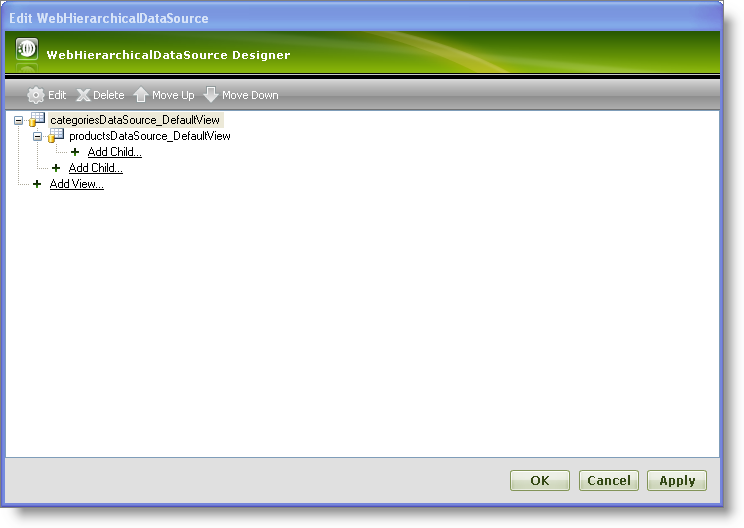
Click OK to finish adding the relation between the two data sources. Now your WebHierarchicalDataSource Designer looks similar to the following image :
Click Apply and then OK to close the designer.
At this point your WebDataMenu doesn’t show the data. To specify the data bindings click Edit DataBindings from the WebDataMenu control’s smart tag in order to open the WebDataMenu Designer dialog.
Select the categoriesDataSource_DefaultView and click Add DataBinding. This will add the node to the Selected databindings area. Set the TextField property to CategoryName by clicking the drop-down list in the property window so that CategoryName will be the display text of the node. Similarly, set the ValueField property to CategoryID.
Repeat the above step to add the following data bindings to the productsDataSource_DefaultView :
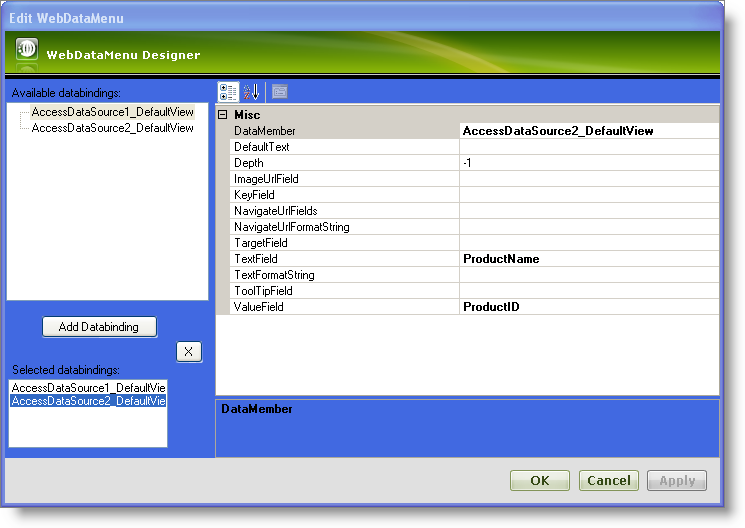
Your WebDataMenu Designer now looks similar to the following image :
Click OK to close the designer.
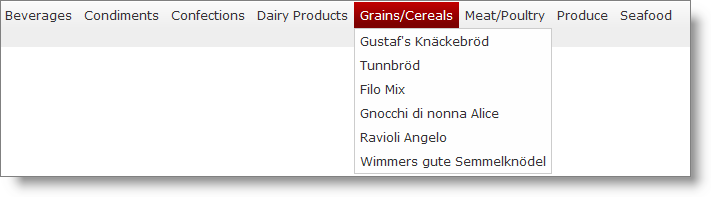
Save and run your application. Your WebDataMenu now looks similar to the following image: