
In the 2005 Volume 1 release, the WebMisc assembly was added to the list of assemblies already in Ultimate UI for ASP.NET. Included in the WebMisc assembly were two new controls: the WebPanel™ control and the WebGroupBox™ control. This procedure involves the WebGroupBox control.
Create a new Visual Studio .NET ASP.NET Web Application.
From you toolbox locate the WebGroupBox control and drag it onto your form.
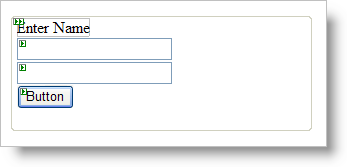
To add controls to WebGroupBox, drag them into the editable region of WebGroupBox. Add a standard ASP.NET label, button, and two textboxes to the editable region. It is also possible to drag a user control (.ascx) into the content template here by dragging the file from Solution Explorer directly into the WebGroupBox. Your control should look similar to the screen shot below, once these controls are added.
Since the controls contained by the WebGroupBox are not members of the WebForm’s Controls collection, ASP.NET will not automatically declare and reference them in the WebForm class. For this reason, it is necessary to write some code to get valid references to the contained controls. The following lines of code go before the Page_Load event.
In Visual Basic:
' NOTE: to avoid issues in the Visual Studio .NET Web Forms Designer,
' avoid using the controls' actual ID's  here (Button1, Button2, etc).
Protected WithEvents theButton As System.Web.UI.WebControls.Button
Protected WithEvents theFirstText As System.Web.UI.WebControls.TextBox
Protected WithEvents theSecondText As System.Web.UI.WebControls.TextBox
In C#:
// NOTE: to avoid issues in the Visual Studio .NET Web Forms Designer,
// avoid using the controls' actual ID's  here (Button1, Button2, etc).
protected Button  theButton;
protected TextBox theFirstText;
protected TextBox theSecondText;
Next, place the following lines of code in the Page_Load event. This code is what gives us references to the controls inside the WebGroupBox.
In Visual Basic:
' reference contained controls
Me.theButton = CType(Me.WebGroupBox1.FindControl("Button1"), Button)
Me.theFirstText = CType(Me.WebGroupBox1.FindControl("TextBox1"), TextBox)
Me.theSecondText = CType(Me.WebGroupBox1.FindControl("TextBox2"), TextBox)
In C#:
// reference contained controls
this.theButton  = (Button) this.WebGroupBox1.FindControl("Button1");
this.theFirstText = (TextBox)this.WebGroupBox1.FindControl("TextBox1");
this.theSecondText    = (TextBox)this.WebGroupBox1.FindControl("TextBox2");
// set up event handlers for the buttons
this.theButton.Click += new EventHandler(this.buttons_Click);
As the final code addition make the click event for the button, and set the text from the second text box equal to the text of the first text box.
In Visual Basic:
Private Sub buttons_Click(ByVal sender As Object, _
  ByVal e As EventArgs) Handles theButton.Click
        Me.theSecondText.Text = Me.theFirstText.Text
End Sub
In C#:
private void buttons_Click(object sender, EventArgs e)
{
        this.theSecondText.Text = this.theFirstText.Text;
}
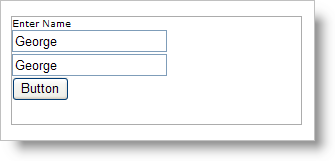
If you build and run the project, and input some data into the first text box and click the button, the text will appear in the second text box.