
This topic explains, with code examples, how to configure the WebUpload™ control.
The following topics are prerequisites to understanding this topic:
This topic contains the following sections:
The WebUpload control has a large set of options which allow you to customize it for your specific needs. You can control the allowed file types, specify the number of files that can upload simultaneously, configure the user interactions in the file panel (how many files they can select for upload in one pass and how this is displayed in the WebUpload panel ), and choose whether the upload will start automatically or after some explicit user action. For further details, refer to WebUpload Configuration summary chart and the sections that follow it.
The following table lists the configurable aspects of WebUpload . Additional details are available after the table.
You can configure whether users, when selecting the files to upload, will be able to select multiple files or only one file at a time. This functionality is managed by the file selection mode of WebUpload . The file selection mode can be either Single File (users can select only one file at one pass) or Multiple Files (users can select multiple files at one pass).
In Multiple Files file selection mode, users can:
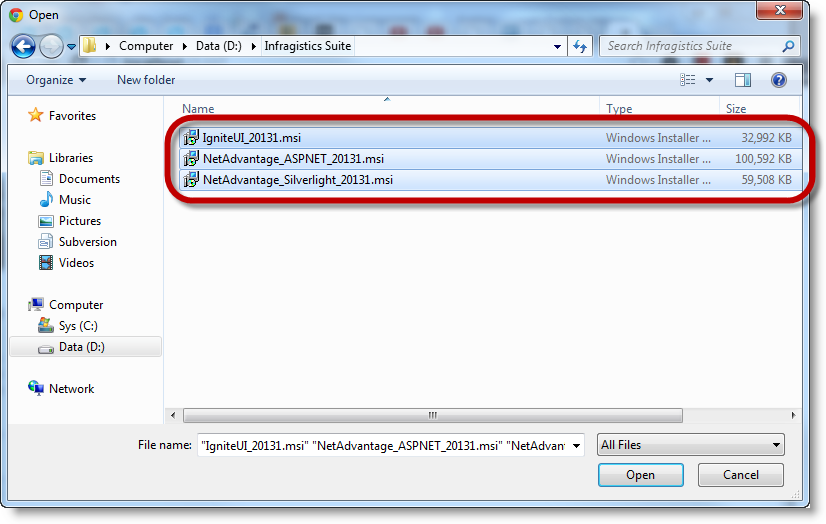
Select multiple files at once from the file Open dialog
Drag-and-drop the files from Windows® Explorer onto the WebUpload control
In Single File selection mode, users can select only one file in the file Open dialog and cannot drag-and-drop files. If they want to upload multiple files, they will have to add the files to the WebUpload control panel repeating the adding procedure for each file.
The following pictures illustrate the two alternative file selection approaches: selecting multiple files in the file Open dialog (left) or dragging and dropping them from Windows Explorer onto the WebUpload control panel (right).
The default file selection mode is Single File.
The file selection mode is managed by the Mode and MultipleFiles options. Setting MultipleFiles to true makes sense only when Mode is Multiple . When Mode is Single , MultipleFiles has no effect.
The File Selection Mode feature employs the HTML 5 multiple attribute of the input element. This makes the feature browser-dependent. If an unsupported browser is used, then setting the feature’s properties has no effect, meaning that users will not be able to select multiple files from the file Open dialog or drag-and-drop them onto the WebUpload control. For the list of the supported browsers, see Requirements.
Following are the requirements for configuring the file selection type:
A browser supporting HTML 5 multiple attribute of the input element
This functionality is available only in the following browsers:
The following table maps the desired configuration to its respective property settings.
This example demonstrates how to enable multiple files selection as a result of the following settings:
Following is the code that implements this example.
In ASPX:
<ig:WebUpload ID="WebUpload1" runat="server" Mode="Multiple" MultipleFiles="True">
</ig:WebUpload>You can configure whether the upload will start automatically once the user has added the file(s) to the WebUpload panel or manually (on user’s pressing the Upload button). This functionality of the WebUpload control is called “upload trigger”. The upload trigger enables or disables the automatic start of the file upload.
The default upload trigger is Manual.
The upload trigger is managed by the AutoStartUpload option of the WebUpload control.
The following table maps the desired configuration to its respective property settings.
This example demonstrates how to enable automatic upload for users a result of the following settings:
Following is the code that implements this example.
In ASPX:
<ig:WebUpload ID="WebUpload1" runat="server" AutoStartUpload="True">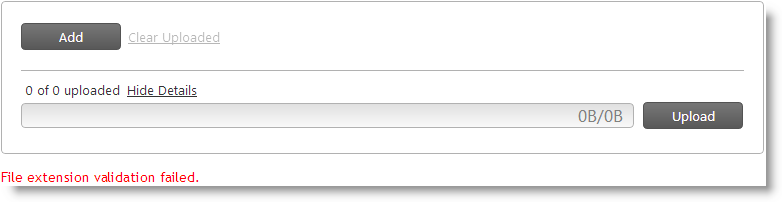
</ig:WebUpload>You can configure which types of files will be allowed for users to upload. This functionality is handled by explicitly listing the file name extensions of the allowed file types in a list of permissible file types. This list is a collection of FileUploadExtension objects representing the allowed file extensions as the value of the AllowedExtensions property.
By default, all file types can be uploaded.
The file extension validation compares the selected file extension against the list of extensions declared in AllowedExtenstions property. When the file extension validation fails, the WebUpload ‘s onError event is raised. The second parameter of the onError handler contains an object with property errorCode = 2 and the errorMessage = “File extension validation failed.” It is up to you to decide how to present the error to the user.
The following table maps the desired configuration to its respective property settings.
This example demonstrates how to set allowed users to upload .xls and .doc files:
Following is the code that implements this example.
In ASPX:
<ig:WebUpload ID="WebUpload1" runat="server">
    <AllowedExtensions>
        <ig:FileUploadExtension Extension="doc" />
        <ig:FileUploadExtension Extension="xls" />
    </AllowedExtensions>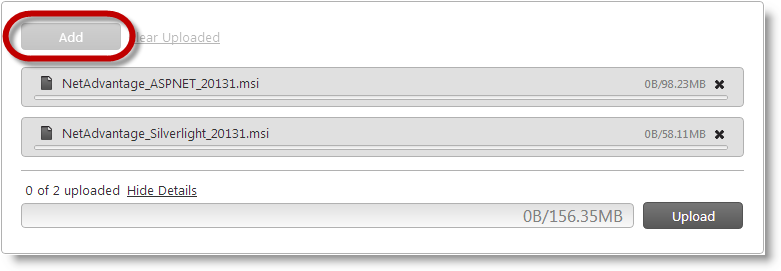
</ig:WebUpload>You can configure the maximum number of files that can be uploaded per page refresh. Once this limit is reached, the Add button in the WebUpload control’s panel is disabled. When File Selection mode is Multiple, an error is thrown when the number of selected files exceeds the limit.
By default, there is no restriction on the number of files to upload.
When you have MultipleFiles = True users can select files exceeding this threshold raising an WebUpload onError event. The second parameter of the onError handler contains object with property errorCode = 1 and the errorMessage = “Maximum count of uploading files exceeded.” It is up to you to decide how to present the error to the user.
The following table maps the desired configuration to its respective property settings.
This example demonstrates how to set the maximum number of files to upload to 2:
The following picture demonstrates the Add button disabled as a result of reaching the maximum number of allowed files for upload.
Following is the code that implements this example.
In ASPX:
<ig:WebUpload ID="WebUpload1" runat="server" MaxUploadedFiles="2">
</ig:WebUpload>You can limit the number of files that can be simultaneously uploaded. Selecting files in excess of this threshold, limits the number of simultaneously uploaded files to this threshold, on a first come first serve basis, holding the excess files in abeyance until the number of files being uploaded falls below this threshold. This process continues with each of the remaining files being added to the simultaneous upload as other files complete their upload.
The maximum number of files that can be uploading simultaneously is managed by the MaxSimultaneousFilesUploads property.
The following table maps the desired configuration to its respective property settings.
The code samples below demonstrate how to set maximum simultaneous files uploads:
Following is the code that implements this example.
In ASPX:
<ig:WebUpload ID="WebUpload1" runat="server" MaxSimultaneousFilesUploads="2">
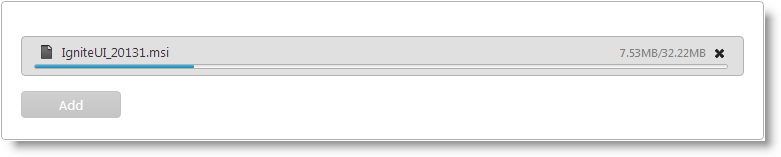
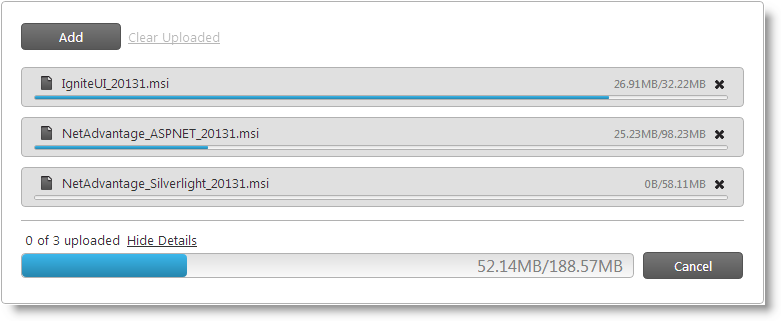
</ig:WebUpload>You can configure how many files can be displayed in the panel of the WebUpload control. This functionality is managed by the file display mode of WebUpload . The file selection mode can be either Single File (only one file is shown in the panel) or Multiple Files (multiple files shown in the panel).
In Multiple Files mode, the panel displays several files (arranged vertically).
In Single File mode, only one file at a time can be displayed.
The following pictures compare Single File mode and Multiple Files mode.
The default file mode setting is Single File.
The number of displayed files in Multiple Files mode cannot exceed the MaxUploadedFiles setting. Depending on the situation, exceeding the MaxUploadedFiles setting result with the following:
When MultipleFiles = False, disables the Add button when the number of files equals the MaxUploadedFiles setting.
When MultipleFiles = True, throws an error if the number of selected files exceeds the MaxUploadedFiles setting.
The following table maps the desired configuration to its respective property settings.
This example demonstrates setting the display mode to Multiple Files. This is a result of the following settings:

Following is the code that implements this example.
In ASPX:
<ig:WebUpload ID="WebUpload1" runat="server" Mode="Multiple">
</ig:WebUpload>The following topics provide additional information related to this topic.
The following samples provide additional information related to this topic.