<PropertyGroup>

   <TargetFramework>net461</TargetFramework>

   <RuntimeIdentifier>win7-x64</RuntimeIdentifier>

</PropertyGroup>The Reveal Server SDK requires .NET Core 2.2+ or .NET Framework 4.6.1+ ASP MVC application projects.
In case you are targeting .NET Framework 4.6.1+, the Reveal Server SDK supports a win7-x64 runtime environment. To debug your web project you need to add a win7-x64 compatible RuntimeIdentifier platform:
<PropertyGroup>
<TargetFramework>net461</TargetFramework>
<RuntimeIdentifier>win7-x64</RuntimeIdentifier>
</PropertyGroup>To set up the Reveal Web Server SDK you need to:
To add references to assemblies and install dependency packages we recommend using NuGet package manager.
The easiest way to setup your project is installing Infragistics.Reveal.Sdk.Web.AspNetCore (Trial) NuGet package.
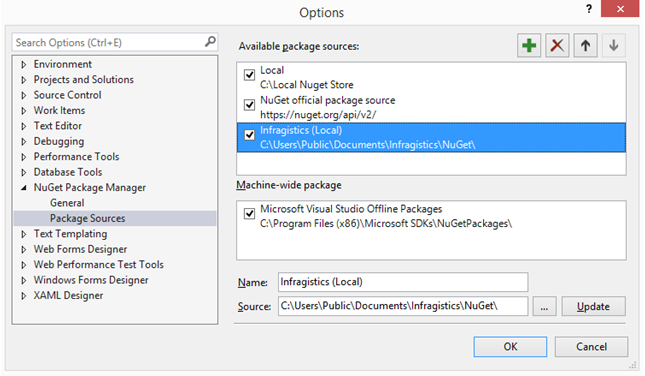
After installing the Reveal SDK, you should be able to find a new NuGet package source added to your nuget.config called Infragistics (Local) that points to “%public%\Documents\Infragistics\NuGet”.
After ensuring you have the Infragistics (Local) feed properly configured by the installer, you need to:
install the Infragistics.Reveal.Sdk.Web.AspNetCore NuGet package to your application project.
add a NuGet package reference to System.Data.SQLite version 1.0.111+
If you are having issues with the build, follow this link.
After referencing the required DLLs, you need to create a class that implements the IRevealSdkContext interface. This interface allows the Reveal SDK to run inside of your host application and provides callbacks for working with the SDK.
using Infragistics.Sdk;
public class RevealSdkContext : IRevealSdkContext
{
    public IRVDataSourceProvider DataSourceProvider => null;

    public IRVDataProvider DataProvider => null;

    public IRVAuthenticationProvider AuthenticationProvider => null;

    public async Task<Stream> GetDashboardAsync(string dashboardId)
    {
        return await Task.Run(() =>
        {
            //load a .rdash file as a stream and return it
            var fileName = $"C:\\Temp\\{dashboardId}.rdash";
            return new FileStream(fileName, FileMode.Open, FileAccess.Read);
        });
    }

    //This callback is used only when “onSave” event is not installed on the
    //RevealView object client side. For more information see the web client SDK documentation
    public async Task SaveDashboardAsync(string userId, string dashboardId, Stream dashboardStream)
    {
        //Save edited dashboard here
        await Task.Run(() => { });
    }
}
The implementation above will load dashboards from “C:\Temp” folder, looking for a .rdash file that depends on the dashboardId variable. In your application, you may want to change this to load dashboards from another directory, from the database, or even from an embedded resource.
In the Startup.cs, in the ConfigureServices method of the application, call the services extension method AddRevealServices, passing in the RevealEmbedSettings class.
The AddRevealServices extension method is defined in the Infragistics.Sdk namespace, so you will need to add a using directive. In addition, you also need to set the CachePath property as shown below.
services.AddRevealServices(new RevealEmbedSettings
{
    LocalFileStoragePath = @"C:\Temp\Reveal\DataSources",
    CachePath = @"C:\Temp"
}, new RevealSdkContext());Finally, you need to add Reveal endpoints by calling the AddReveal extension method when adding MVC service. Similar to the following code snippet:
services.AddMvc().AddReveal();Like AddRevealServices, the AddReveal method is defined in the Infragistics.Sdk namespace, so you need a using directive too.
In order to use the export to image functionality (either programmatically or through user interaction), you need to perform the steps below:
Get the following three files from <InstallationDirectory>\SDK\Web\JS\Server:
package.json
packages-lock.json
screenshoteer.js
Copy the files to the root level of your project (parent folder of "wwwroot").
Make sure you have npm (the package manager for Node.js) installed.
If you don’t need the export to image functionality, you don’t need to copy the files to your projects. However, when trying to build the project, it will fail complaining that it cannot find npm.
To solve this error, add the following property to your project:
<PropertyGroup>
  <DisableRevealExportToImage>true</DisableRevealExportToImage>
</PropertyGroup>To handle a deployment issue related to SQLite.Interop.dll, custom .targets file are used in the NuGet package.
If you are having build issues, you can disable this behavior by adding the following property to your project:
<DisableSQLiteInteropFix>true</DisableSQLiteInteropFix>