Version

Implementing a TextDocument with a RichTextBox

Introduction

Implementing TextDocument with a RichTextBox summary

Used “behind the scenes” the TextDocument class can highlight text in a RichTextBox control according to the grammar of a custom-defined language. This allows users to see the structure of a document with keywords distinctly highlighted in the text. The following sections outline the essential steps required to implement this functionality.

Note
Note:

To use the TextDocument, your project must have a reference to one of the following Infragistics files:

Infragistics4.Documents.TextDocument.v24.1.dllor

Infragistics.Documents.TextDocument.dll.

Step 1: Create a Grammar Object – Code Example

Description

Create a new Grammar object for the custom language by calling the FromEbnf() method and passing the string contents of the Extended Backus–Naur Form (EBNF) script, and a new instance of an EbnfParser. This step requires an EBNF script; a text-based script that defines the grammar, lexer states, terminal symbols, and other attributes of a custom-defined language.

This step creates a Grammar object from the EBNF. Used in a subsequent step, the Grammar object generates a C# class that will be used by the TextDocument.

The following code example shows this step with reference to an EBNF script that defines the grammar for XML:

Code

In C#:

//  Get the EBNF script from a resource “EBNF.XML.ebnf” and assign to a string
string ebnf = GetEbnf("EBNF.XML.ebnf");
//  Create a Grammar instance from the EBNF script, using an EbnfParser.
Grammar grammar = new Grammar();
EbnfParser ebnfParser = new EbnfParser();
//  Create the Grammar and capture the results of the operation to
//  confirm its successful completion.
EbnfParseResult result = grammar.FromEbnf(ebnf, ebnfParser);
Step 2: Generate a Custom Language Class – Code Example

Description

Call the static LanguageGenerator class’ GenerateClass() method to create a custom language class and pass in the Grammar object created previously in step 1.

The following code example creates a XMLLanguage.cs code file to provide an API for the language called “XML Language”. The newly created file, XMLLanguage.cs can be compiled in applications containing RichTextBoxes capable of displaying an XML document with highlighted tokens (see subsequent steps below).

Code

In C#:

//  Generate the code for a LanguageBase-derived class from the grammar.
//  This will create the data required for our internal lexer and parser.
LanguageGenerationParams args = new LanguageGenerationParams(grammar, "XMLLanguage", "XMLLanguage.cs", true);
LanguageGenerator.GenerateClass(args);

Step 3: Parse a Document with the TextDocument – Code Example

Description

Use the TextDocument object to parse a document in memory.

The following code example shows a TextDocument being instantiated using the custom language class created in Step 2 above ( XMLLanguage.cs ) and parsing the XML text from a TextBox control. At this point, the TextDocumentSnapshot object in memory stores the parsed document; however, the UI does not yet display it.

Code

In C#:

//  Create the TextDocument with an instance of the XMLLanguage that was previously
//  generated by the LanguageGenerator
private TextDocument _textDocument;
_textDocument = new TextDocument();
_textDocument.Language = XMLLanguage.Instance;
//  Delete any text that may be in the current TextDocumentSnapshot.
//  Append the text from a TextBox on the form.
//  Parse the text according to the grammar rules in the XMLLanguage instance.
_textDocument.Delete();
_textDocument.Append(textBox.Text);
_textDocument.Parse();

Step 4: Display the Parsed Text in a RichTextBox – Code Example

Description

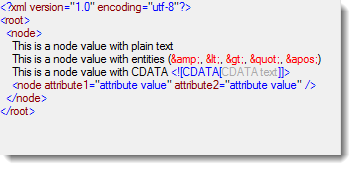
You can display the parsed text in a RichTextBox with the various tokens highlighted according to the custom language. The RichTextBox should appear similar to the one pictured below:

Image

Implementing TextDocument with RichTextBox 1.png

Code

In C#:

//  Get the snapshot from which the tree was created
TextDocumentSnapshot snapshot = _textDocument.SyntaxTree.Snapshot;
//  Get a token enumerator which includes all tokens
IEnumerable<Token> tokens = snapshot.GetTokens();
//  Enumerate the tokens and populate the rich textbox
RichTextBox rtb = richTextBox1;
rtb.Text = snapshot.GetText();
int breakOffsets = 0;
foreach (Token token in tokens)
{
    string tokenText = token.Text;
    if (tokenText.Length == 0)
        continue;
    if (tokenText.Equals("\r\n"))
    {
        breakOffsets++;
        continue;
    }
    rtb.Select(token.OverallOffset - breakOffsets, tokenText.Length);
    //  Set the color for the token based on what we defined
    //  in the language.
    Color color = XMLLanguage.GetColor(token.TerminalSymbol);
    rtb.SelectionColor = color;
}

Related Content

Topics

The following topic provides additional information related to this topic.

Topic Purpose

This topic uses descriptive text and code snippets to illustrate the TextDocument class methods for text modification.

This topic uses descriptive text and code snippets to illustrate the TextDocument class events.

This topic uses descriptive text and code snippets to illustrate the TextDocument class properties that allow for configuration and provide information about the class.