Installing application components into the Global Assembly Cache (GAC) can be useful if you are installing components that will be used by multiple applications on the same machine, or if you need to run multiple versions of the same assembly on a single computer.
By default, when you install the Ultimate UI for Windows Forms toolset, the control assemblies are installed into the GAC. If you would like to deploy the Infragistics components that are part of your application into the GAC of the client computer there are two primary methods.
The Gacutil.exe tool is a command line utility installed as part of the base .NET framework which can be used to add and remove application components to/from the GAC. The Gacutil.exe tool is located in the .NET Framework installation directory. The default location for this is C:\Program Files (x86)\Microsoft SDKs\Windows\v10.0A\bin\NETFX 4.6.2 Tools.
To use the Gacutil.exe tool:
Open a Visual Studio command prompt
( Start > Programs > Visual Studio 2017 > Visual Studio .NET Tools > Developer Command Prompt for VS 2017 )
Enter the Gacutil.exe command. The following line demonstrates adding the Infragistics WinChart component to the GAC from an application’s folder called MyApplication.
gacutil -i C:\Projects\MyApplication\Infragistics.Win.UltraWinChart.v25.2.dll
Gacutil.exe command line include a number of commands that allow you to specify the operation you want the tool to perform. The list below explain the available commands:
/i - Installs an assembly to the GAC
/il - Installs one or more assemblies to the GAC
/u - Uninstalls an assembly from the GAC
/ul - Uninstalls one or more assemblies from the GAC
/ungen - Uninstalls a native images installed via the NGEN utility
/l - List the GAC filtered by <assembly_name>
/lr - List the GAC with all traced references
/cdl - Deletes the contents of the download cache
/ldl - Lists the contents of the download cache
Gacutil.exe also allows for several options to be specified on the command line:
/r - Specifies a traced reference to install or uninstall
/f - Forces reinstall of an assembly
/nologo - Suppresses the display of the logo banner
/silent - Suppressed the display f all output
Because the GAC is a complex storage location for .NET assemblies, it is not easy to view the contents of it like you would be able to view the contents of a standard folder in Windows. Thankfully the .NET Framework SDK includes a Windows Explorer extension (SHFusion.dll) that can be used to access the GAC in much the same fashion as a standard windows folder. Using this extension you can view, add or remove files from the GAC using standard Explorer menus or drag and drop operations.
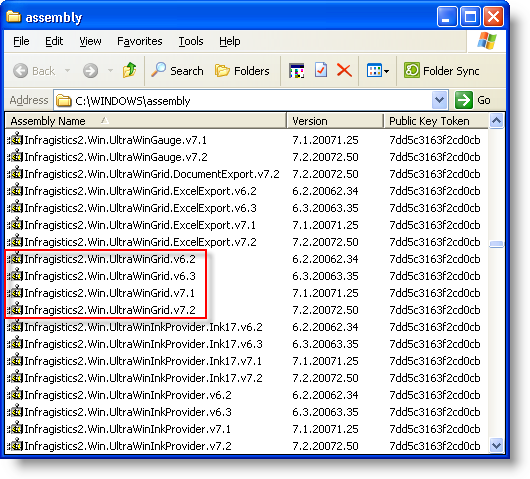
If you have the .NET Framework SDK installed, you can access the GAC through windows explorer by opening C:\Windows\Assembly . The image below shows you how the GAC is displayed in Explorer using the extension.

Using this view, you can add assemblies to the GAC by simply dragging and dropping them into the ASSEMBLY folder. You can also delete files from the GAC by selecting the Delete option from the File menu, or the context menu. Also, as you can see by the image above, using the GAC you can install multiple versions of the same assembly onto the same machine. Each application that references the assembly will select the appropriate version based on internal meta-data.
For more information on the use of the GAC and installing applications into the GAC please see these resources: