
Bar Markers are displayed as bars that have a start and end point on the scale.
You can add a bar marker to your gauge:
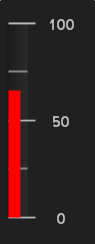
When you save and run your application after completing the following steps, your gauge should look similar to the gauge below.
To add a bar marker to an existing Linear gauge using the Gauge Designer:
In the Gauge Explorer, expand Markers.
Click Add Marker and select New Bar Marker.
In the Properties panel, click Bar Marker Layout tab. In the Extent pane, set the following properties:
Inner — 10
Outer — 70
In the Value pane of the Bar Marker Layout tab, set the following property:
Value — 65
Click the Appearance tab. In the Brush pane, set the following properties:
Type — Solid
Color — Red
To add a bar marker to an existing Linear gauge at design time:
Within the Gauges collection editor, click Linear Gauge.
Locate the Scales property and click the Ellipsis (…) to launch the Scales collection editor.
Locate the Markers property and click the Ellipsis (…) to launch the Markers collection editor.
Click Add, and select Add Bar Marker.
Locate the BrushElement property. From the BrushElement drop-down list, select Solid Fill. This will create a new Solid Fill brush element.
Expand the newly created BrushElement property, and locate the Color property. Set the Color property to Red.
Set the following properties:
InnerExtent — 10
OuterExtent — 70
Value — 65
To add a bar maker to your gauge at run time:
Before you start writing any code, you should place using/Imports directives in your code-behind so you don’t need to always type out a member’s fully qualified name.
In Visual Basic:
Imports Infragistics.UltraGauge.Resources
In C#:
using Infragistics.UltraGauge.Resources;
Create the load event.
Create instances of the classes:
In Visual Basic:
Dim myLinearGauge As LinearGauge = Me.UltraGauge1.Gauges(0)
Dim myScale As LinearGaugeScale = myLinearGauge.Scales(0)
Dim myBarMarker As New LinearGaugeBarMarker()
Dim mySolidFillBrushElement As New SolidFillBrushElement()
In C#:
LinearGauge myLinearGauge = this.ultraGauge1.Gauges[0] As LinearGauge;
LinearGaugeScale myScale = myLinearGauge.Scales[0];
LinearGaugeBarMarker myBarMarker = new LinearGaugeBarMarker();
SolidFillBrushElement mySolidFillBrushElement = new SolidFillBrushElement();
Set the following color properties:
Type — Solid
Color — Red
In Visual Basic:
mySolidFillBrushElement.Color = System.Drawing.Color.Red
myMarker.BrushElement = mySolidFillBrushElement
In C#:
mySolidFillBrushElement.Color = System.Drawing.Color.Red;
myBarMarker.BrushElement = mySolidFillBrushElement;
Set the following properties:
InnerExtent — 10
OuterExtent — 70
Precision — 0
Value — 65
In Visual Basic:
myBarMarker.InnerExtent = 10
myBarMarker.OuterExtent = 70
myBarMarker.Precision = 0
myBarMarker.Value = 65
In C#:
myBarMarker.InnerExtent = 10;
myBarMarker.OuterExtent = 70;
myBarMarker.Precision = 0;
myBarMarker.Value = 65;
Add your bar marker to the Scales collection:
In Visual Basic:
myScale.Markers.Add(myBarMarker)
In C#:
myScale.Markers.Add(myBarMarker);