Imports Infragistics.Win.UltraWinGrid

Before You Begin
Conditional Formatting relies on various implementations of the ICondition interface. When working with Conditional Formatting, you can select from several included conditions. There may be situations where you will need to create a custom condition. This topic will show you how to create your own custom ICondition Implementation. This interface can be used for implementing a condition against which to compare a value. Although this is a simple implementation, you will learn the basics of what is required for implementing this interface so that you can create more complex and elegant conditions.In order to implement the ICondition interface you simply need to include the Matches method and the PropertyChanged Event in your class.
What You Will Accomplish
In this walkthrough you will learn how to create a custom condition by implementing the ICondition interface. This walkthrough refers to a class named MyCustomCondition which has been designed to simply match string values in a WinGrid™ cell. If the cell’s value matches then the Appearance Object attached to the condition is applied to the Grid Cell.
Follow these Steps
Before you start writing any code, you should place using/Imports directives in your code-behind so you don’t need to always type out a member’s fully qualified name.
In Visual Basic:
Imports Infragistics.Win.UltraWinGrid
In C#:
Using Infragistics.Win.UltraWinGrid;
Drag an UltraGrid from the Visual Studio® Toolbox and drop it on to your form. Bind the UltraGrid control to Customers table of the Northwind Database. For more information on binding WinGrid™ to a datasource, see Bind WinGrid to a Flat Data Source
Add an UltraButton and a Textbox to the form. Write “Change Condition Text” in the text property of the Button.
Create a Class file named MyCustomCondition that implements the ICondition interface. This class contains code that implements the Matches method and the PropertyChanged Event that are members of the ICondition interface. Also a property ValueToCheck is exposed with the purpose of providing the condition a string to match. Whenever the ValueToCheck property setter is assigned a value, we then raise the PropertyChanged event. Write the following code within MyCustomCondition class.
In Visual Basic:
''' This particular class requires a string that represents
''' the value that a cell must match.
''' </summary>
''' <param name="theValueToCheck"></param>
Public Sub New(theValueToCheck As String)
  _valueToCheck = theValueToCheck
End Sub
'This property allows the ability to change
'the value to check at runtime.
Private _valueToCheck As String = String.Empty
Public Property ValueToCheck() As String
   Get
    Return _valueToCheck
   End Get
   Set
     _valueToCheck = value
     'very important: since the value that gets
     'checked can change at runtime, we need to re-evaluate
     'all cells again when the value changes. This is when
     'you will want to fire the PropertyChanged event.
     RaiseEvent PropertyChanged(Me, New EventArgs())
   End Set
End Property
In C#:
/// This particular class requires a string that represents
        /// the value that a cell must match.
        /// </summary>
        /// <param name="theValueToCheck"></param>
        public MyCustomCondition(string theValueToCheck)
        {
            _valueToCheck = theValueToCheck;
        }
        //This property allows the ability to change
        //the value to check at runtime.
        private string _valueToCheck = string.Empty;
        public string ValueToCheck
        {
            get
            {
                return _valueToCheck;
            }
            set
            {
                _valueToCheck = value;
                //very important: since the value that gets
                //checked can change at runtime, we need to re-evaluate
                //all cells again when the value changes. This is when
                //you will want to fire the PropertyChanged event.
                if (PropertyChanged != null)
                {
                    this.PropertyChanged(this, new EventArgs());
                }
            }
        }
The Matches method is invoked by WinGrid when the PropertyChanged event is raised. This method checks each cell in the ContactTitle column against the valueToCheck property value which is whatever the end user entered in the Textbox.
Write the following code in the Matches method.
In Visual Basic:
'_valueToCheck = "Owner";
If value IsNot Nothing Then     Return
  (value.ToString().Equals(_valueToCheck))
End If
 Return False
In C#:
//_valueToCheck = "Owner";
            if (value != null)
            {
                return (value.ToString().Equals(_valueToCheck));
            }
           return false;
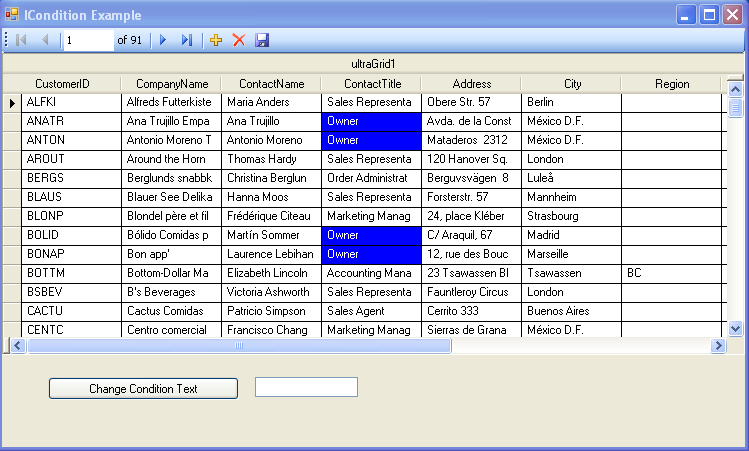
The WinGrid’s Contact Title Column uses the MyCustomCondition. Create an Instance of MyCustomCondition class with the value “Owner” passed to its constructor. If a cell’s value in the Contact Title Column equals “Owner” then whatever properties were set in the attached Appearance object are applied to the cells of that column. This particular Appearance object has been configured so that the BackColor is Blue and the ForeColor is White.
In Visual Basic:
Dim _MyCustomCondition As New MyCustomCondition("Owner")
In C#:
MyCustomCondition _MyCustomCondition = new MyCustomCondition("Owner");
In the Form_Load event write the following code.
In Visual Basic:
' TODO: This line of code loads data into the 'nwindDataSet.Customers' table. You can move, or remove it, as needed.
Me.customersTableAdapter.Fill(Me.nwindDataSet.Customers)
'This is the appearance that will be applied
'to the cells where the Condition is met.
Dim a As New Infragistics.Win.Appearance()
a.BackColor = Color.Blue
a.ForeColor = Color.White
'Create the ConditionValueAppearance and then add
'the Custom Condition and the Appearance object.
Dim c As New ConditionValueAppearance()
c.Add(_MyCustomCondition, a)
'Then assign the ConditionValueAppearance to the
'Contact Title column.
Me.customersUltraGrid.DisplayLayout.Bands(0).Columns("ContactTitle").ValueBasedAppearance = c
In C#:
 // TODO: This line of code loads data into the 'nwindDataSet.Customers' table. You can move, or remove it, as needed.
 this.customersTableAdapter.Fill(this.nwindDataSet.Customers);
 //This is the appearance that will be applied
 //to the cells where the Condition is met.
 Infragistics.Win.Appearance a = new Infragistics.Win.Appearance();
 a.BackColor = Color.Blue;
 a.ForeColor = Color.White;
 //Create the ConditionValueAppearance and then add
 //the Custom Condition and the Appearance object.
 ConditionValueAppearance c = new ConditionValueAppearance();
 c.Add(_MyCustomCondition, a);
 //Then assign the ConditionValueAppearance to the
 //Contact Title column.
 this.customersUltraGrid.DisplayLayout.Bands[0].Columns["ContactTitle"].ValueBasedAppearance = c;
Typing a value into the TextBox and clicking the button will conditionally format any Contact Title cell that matches the value. Once the ValueToCheck property setter is assigned a value, the PropertyChanged event is fired thus causing the cell values to be re-evaluated once again. Write the following line of code in the button click event.
In Visual Basic:
_MyCustomCondition.ValueToCheck = Me.textBox1.Text
In C#:
_MyCustomCondition.ValueToCheck = this.textBox1.Text;
Run the application. You will see that the Cells that have a Contact Title value of “Owner” are formatted with a blue background and a white foreground. If any other value is typed in the Textbox and the button is clicked, the cells are re-evaluated and anything matching the new value is formatted in the same fashion.