

This topic is designed to show you how to create the UltraTaskPaneToolbar using the built in designers of the WinToolbarsManager™.
Starting in Ultimate UI for Windows Forms 2005 Volume 1 a new toolbar type, based off of the Microsoft Office task pane style, was introduced called the UltraTaskPaneToolbar . The task pane is implemented as a derived UltraToolbar, and therefore behaves much like a standard toolbar, which may be dragged and displayed within a floating window. The content area of the UltraTaskPaneToolbar is occupied by the Control associated with the selected TaskPaneTool .
Create a new Visual Studio C# or VB.NET Windows Application.
With the form open in design view, navigate in the toolbox to the UltraToolbarsManager component. Left click and drag an UltraToolbarsManager onto the form, or double click on the component in the toolbox to add it to your project. A dialog will come up asking if you would like to add a panel control container to the form, select No.
With the UltraToolbarsManager1 selected in the components tray, left or right click on the form designer button that says New Toolbar. You will be presented with the new toolbar dialog.
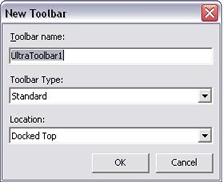
From the New Toolbar dialog in the first textbox, below where it says Toolbar name, type in myTaskPane. This will be the name and the key assigned to identify this TaskPaneToolbar in the toolbars collection of the UltraToolbarsManager.
Then select from the Toolbar Type drop down TaskPane Toolbar.
Then in the final drop down, for the Location of the toolbar, select Docked Right and click OK. This will add the UltraTaskPaneToolbar to the right side of the form.
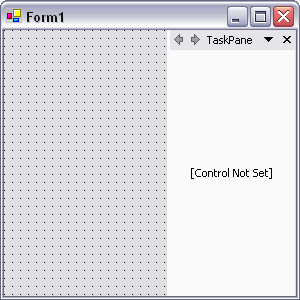
Your form in the designer should look something like the screenshot below.
This is the basics of creating the UltraTaskPaneToolbar. You can right click on the UltraToolbarsManager1 component and mouse down to Customize, and in the Customize dialog Toolbars tab you can see the UltraTaskPaneToolbar we just created and change any of its properties like you would a normal toolbar you created with the designer.