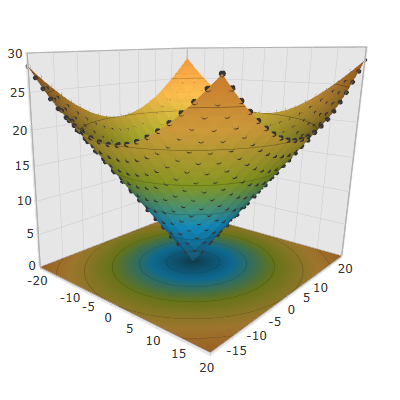
This topic explains how to configure the data point markers in the XamScatterSurface3D™ control.
The following topics are prerequisites to understanding this topic:
The following table lists the external articles required as a prerequisite to understanding this topic.
This topic contains the following sections:
Use the XamScatterSurface3D ShowPointMarkers property to show/hide data point markers in the xamScatterSurface3D control.
By default, data point markers are not visible and this property value is False.
The following table maps the desired configuration to the property settings that manage it.
The screenshot below demonstrates how the xamScatterSurface3D control looks as a result of the following settings:

Following is the code that implements this example.
In XAML:
<ig:XamScatterSurface3D Name="SurfaceChart"
 ItemsSource="{Binding Path=DataCollection}"
 XMemberPath="X" YMemberPath="Y" ZMemberPath="Z"
 ShowPointMarkers="True"/>
In C#:
…
SurfaceChart.ShowPointMarkers = true;
In Visual Basic:
…
SurfaceChart.ShowPointMarkers = TrueUse the XamScatterSurface3D PointMarkerMaterial property to configure the material of the xamScatterSurface3D control markers.
The following table maps the desired configuration to the property settings that manage it.
The screenshot below demonstrates how the markers looks as a result of the following settings:

Following is the code that implements this example.
In XAML:
<ig:XamScatterSurface3D Name="SurfaceChart"
 ItemsSource="{Binding Path=DataCollection}"
 XMemberPath="X" YMemberPath="Y" ZMemberPath="Z"
 ShowPointMarkers="True">
    <ig:XamScatterSurface3D.PointMarkerMaterial>
        <DiffuseMaterial Brush="Red" />
    </ig:XamScatterSurface3D.PointMarkerMaterial>
</ig:XamScatterSurface3D>
In C#:
…
var diffuseMaterial = new DiffuseMaterial();
diffuseMaterial.Brush = new SolidColorBrush(Colors.Red);
SurfaceChart.ShowPointMarkers = true;
SurfaceChart.PointMarkerMaterial = diffuseMaterial;
In Visual Basic:
…
Dim diffuseMaterial = New DiffuseMaterial()
diffuseMaterial.Brush = New SolidColorBrush(Colors.Red)
SurfaceChart.ShowPointMarkers = True
SurfaceChart.PointMarkerMaterial = diffuseMaterialUse the XamScatterSurface3D PointMarkerMesh property to configure the 3D marker shape.
The following table maps the desired configuration to the property settings that manage it.
The screenshot below demonstrates how the markers looks as a result of the following code:

Following is the code that implements this example.
In XAML:
<ig:XamScatterSurface3D Name="SurfaceChart"
 ItemsSource="{Binding Path=DataCollection}"
 XMemberPath="X" YMemberPath="Y" ZMemberPath="Z"
 ShowPointMarkers="True">
    <ig:XamScatterSurface3D.PointMarkerMaterial>
        <DiffuseMaterial Brush="Red" />
    </ig:XamScatterSurface3D.PointMarkerMaterial>
    <ig:XamScatterSurface3D.PointMarkerMesh>
        <MeshGeometry3D Positions="-0.01 0.01 0.01, -0.01 -0.01 0.01,
                                    0.01 0.01 0.01, 0.01 -0.01 0.01,
                                    0.01 0.01 -0.01, 0.01 -0.01 -0.01,
                                   -0.01 0.01 -0.01, -0.01 -0.01 -0.01"
                        TextureCoordinates="0 0, 0 1, 1 0, 1 1,
                                            0 0, 0 1, 1 0, 1 1"
                        TriangleIndices="0  1  2,  1  3  2,
                                         6  7  0,  7  1  0,
                                         4  6  2,  6  0  2,
                                         2  3  4,  3  5  4,
                                         3  1  5,  1  7  5,
                                         4  5  6,  5  7  6" />
    </ig:XamScatterSurface3D.PointMarkerMesh>
</ig:XamScatterSurface3D>Use the XamScatterSurface3D PointMarkerTemplate property to use a DataTemplate for xamScatterSurface3D control markers.
The following table maps the desired configuration to the property settings that manage it.
The screenshot below demonstrates how the xamScatterSurface3D control looks as a result of the following code:

Following is the code that implements this example.
In XAML:
<ig:XamScatterSurface3D Name="SurfaceChart"
 ItemsSource="{Binding Path=DataCollection}"
 XMemberPath="X" YMemberPath="Y" ZMemberPath="Z"
 ShowPointMarkers="True">
    <ig:XamScatterSurface3D.PointMarkerMaterial>
        <DiffuseMaterial Viewport2DVisual3D.IsVisualHostMaterial="True" />
    </ig:XamScatterSurface3D.PointMarkerMaterial>
    <ig:XamScatterSurface3D.PointMarkerTemplate>
        <DataTemplate>
            <Rectangle Height="100" Width="100" Fill="Red" />
        </DataTemplate>
    </ig:XamScatterSurface3D.PointMarkerTemplate>
</ig:XamScatterSurface3D>The following topic provides additional information related to this topic.