This topic explains how to apply a custom animation to the xamBusyIndicator™ control.
The following topics are prerequisites to understanding this topic:
In addition to providing a set of pre-built xamBusyIndicator animations, you can also create a custom animation and apply it to the control.
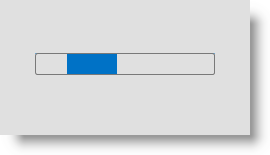
The following screenshot is a preview of the final result.

The following steps demonstrate how to apply a custom animation to the xamBusyIndicator control:
Add XamBusyIndicator to your page
Add the xamBusyIndicator to your page:
In XAML:
<ig:XamBusyIndicator Name="BusyIndicator" IsBusy="True" />Create a custom DataTemplate
Create a custom data template as a Window resource:
In XAML:
<Window.Resources>
    <Style TargetType="{x:Type ProgressBar}" x:Key="ProgressBarStyle" >
    <!-- STYLE CONTENT HERE -->
    </Style>
    <DataTemplate x:Key="CustomBusyIndicatorTemplate">
        <ProgressBar Height="22" Width="180" IsIndeterminate="True" Style="{StaticResource ProgressBarStyle}"  />
    </DataTemplate>
</Window.Resources>
Create a CustomBusyAnimation object and set it to the Animation property
Use the BusyAnimations class CreateCustomAnimation method to create a CustomBusyAnimation object and set it to the XamBusyIndicator Animation property in code-behind:
In C#:
CustomBusyAnimation customAnimation = BusyAnimations.CreateCustomAnimation(this.Resources["CustomBusyIndicatorTemplate"] as DataTemplate);
BusyIndicator.Animation = customAnimation;
In Visual Basic:
Dim customAnimation As CustomBusyAnimation = BusyAnimations.CreateCustomAnimation(TryCast(Me.Resources("CustomBusyIndicatorTemplate"), DataTemplate))
BusyIndicator.Animation = customAnimation
Or use the following code in XAML:
In XAML:
<ig:XamBusyIndicator.Animation>
    <ig:CustomBusyAnimation DataTemplate="{StaticResource CustomBusyIndicatorTemplate}" />
</ig:XamBusyIndicator.Animation>Following is the full code for this procedure:
Creating a custom template as a Window resource:
In XAML:
<Window.Resources>
    <Style TargetType="{x:Type ProgressBar}" x:Key="ProgressBarStyle" >
        <Setter Property="Foreground" Value="#FF0072C6"/>
        <Setter Property="Background" Value="#FFE0E0E0"/>
        <Setter Property="BorderThickness" Value="1"/>
        <Setter Property="BorderBrush" Value="#FF797979" />
            <Setter Property="Template">
                <Setter.Value>
                    <ControlTemplate TargetType="{x:Type ProgressBar}">
                        <Grid Name="TemplateRoot" SnapsToDevicePixels="true">
                            <Rectangle Fill="{TemplateBinding Background}"/>
                            <Rectangle Name="PART_Track" Margin="0" />
                            <Decorator x:Name="PART_Indicator" HorizontalAlignment="Left" Margin="0">
                                <Grid Name="Foreground">
                                    <Rectangle Fill="{TemplateBinding Foreground}" Name="Indicator"  />
                                    <Grid x:Name="Animation" ClipToBounds="true" Visibility="Hidden">
                                        <Rectangle Fill="{TemplateBinding Background}" Name="HiderPre" Margin="0,0,50,0" >
                                            <Rectangle.RenderTransform>
                                                <ScaleTransform x:Name="HiderPreTransform" ScaleX="0"/>
                                            </Rectangle.RenderTransform>
                                        </Rectangle>
                                        <Rectangle Fill="{TemplateBinding Background}" Name="HiderPost" RenderTransformOrigin="1, 0" Margin="50,0,0,0">
                                            <Rectangle.RenderTransform>
                                                <ScaleTransform x:Name="HiderPostTransform" ScaleX="1"  />
                                            </Rectangle.RenderTransform>
                                        </Rectangle>
                                    </Grid>
                                    <Grid Name="Overlay" Opacity="0.8"/>
                                </Grid>
                            </Decorator>
                            <Border BorderThickness="{TemplateBinding BorderThickness}"
                                        BorderBrush="{TemplateBinding BorderBrush}"
                                        CornerRadius="2"/>
                        </Grid>
                        <ControlTemplate.Triggers>
                            <Trigger Property="IsIndeterminate" Value="True">
                                <Setter TargetName="Animation" Property="Visibility" Value="Visible" />
                                <Trigger.EnterActions>
                                    <BeginStoryboard>
                                        <Storyboard RepeatBehavior="Forever">
                                        <DoubleAnimation Storyboard.TargetName="HiderPreTransform"
                                                                 Storyboard.TargetProperty="(ScaleTransform.ScaleX)" To="1"
                                                                 Duration="0:00:1" AutoReverse="True"/>
                                        <DoubleAnimation Storyboard.TargetName="HiderPostTransform"
                                                                 Storyboard.TargetProperty="(ScaleTransform.ScaleX)" To="0"
                                                                 Duration="0:00:1" AutoReverse="True"/>
                                    </Storyboard>
                                </BeginStoryboard>
                            </Trigger.EnterActions>
                        </Trigger>
                    </ControlTemplate.Triggers>
                </ControlTemplate>
            </Setter.Value>
        </Setter>
    </Style>
    <DataTemplate x:Key="CustomBusyIndicatorTemplate">
        <ProgressBar Height="22" Width="180" IsIndeterminate="True" Style="{StaticResource ProgressBarStyle}"  />
    </DataTemplate>
</Window.Resources>
Adding the xamBusyIndicator to the page and setting a CustomBusyAnimation to the Animation property:
In XAML:
<ig:XamBusyIndicator Name="BusyIndicator" IsBusy="True">
    <ig:XamBusyIndicator.Animation>
        <ig:CustomBusyAnimation DataTemplate="{StaticResource CustomBusyIndicatorTemplate}" />
    </ig:XamBusyIndicator.Animation>
</ig:XamBusyIndicator>The following topics provide additional information related to this topic.