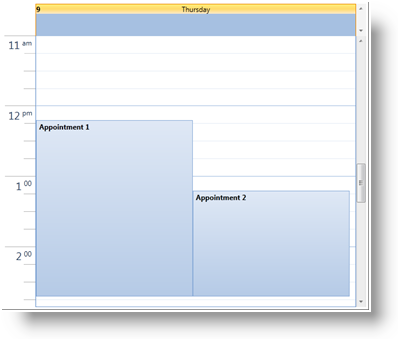
xmlns:ig="http://schemas.infragistics.com/xaml"XamSchedule allows you to show and edit schedule data. This data consists of different types of activities ( appointments, in this walk-through) and every activity has its owning resource and owning calendar. In order to show the appointments in the view ( dayView control is used in the code below) a ListScheduleDataConnector is used to populate the XamScheduleDataManager with data.
You will learn how to define xamSchedule control and its data manager in Procedural Code.
Create a Microsoft® WPF® page.
Add the following NuGet package references to your application:
Infragistics.WPF.Schedules
Infragistics.WPF.Schedules.Dialogs
Create a page and add the namespace declaration for xamSchedule.
In XAML:
xmlns:ig="http://schemas.infragistics.com/xaml"In Visual Basic:
Imports Infragistics.Controls.SchedulesIn C#:
using Infragistics.Controls.Schedules;In the XAML page find the main Grid tag and name it "PageRoot" so you can access it from code-behind.
In XAML:
<Grid Name="PageRoot">
</Grid>
Create a resource and a calendar in the code-behind:
In Visual Basic:
Dim resources As New ObservableCollection(Of Resource)()
Dim resAmanda As New Resource() With { _
        Key .Id = "own1", _
        Key .Name = "Amanda" _
}
resources.Add(resAmanda)
Dim calendars As New ObservableCollection(Of ResourceCalendar)()
Dim calAmanda As New ResourceCalendar() With { _
        Key .Id = "cal1", _
        Key .OwningResourceId = "own1" _
}
calendars.Add(calAmanda)
In C#:
ObservableCollection<Resource> resources =
    new ObservableCollection<Resource>();
Resource resAmanda = new Resource() { Id = "own1", Name = "Amanda" };
resources.Add(resAmanda);
ObservableCollection<ResourceCalendar> calendars =
    new ObservableCollection<ResourceCalendar>();
ResourceCalendar calAmanda = new ResourceCalendar()
{
    Id = "cal1",
    OwningResourceId = "own1"
};
calendars.Add(calAmanda);
Note that the owning resource id of the calendar is the same as the id of the resource.
Create a list of appointments with two items inside:
In Visual Basic:
Dim appointments As New ObservableCollection(Of Appointment)()
        ' Convert the date to universal time,
        ' because a time zone is not set in this snippet
Dim app1 As New Appointment() With { _
        Key .Id = "t1", _
        Key .OwningResourceId = "own1", _
        Key .OwningCalendarId = "cal1", _
        Key .Subject = "Appointment 1", _
        Key .Description = "My first appointment", _
        Key .Start = DateTime.Today.AddHours(9).AddMinutes(12).
            ToUniversalTime(), _
        Key .[End] = DateTime.Today.AddHours(11).AddMinutes(42).
            ToUniversalTime() _
}
appointments.Add(app1)
        ' Convert the date to universal time,
        ' because a time zone is not set in this snippet
Dim app2 As New Appointment() With { _
        Key .Id = "t2", _
        Key .OwningResourceId = "own1", _
        Key .OwningCalendarId = "cal1", _
        Key .Subject = "Appointment 2", _
        Key .Description = "My second appointment", _
        Key .Start = DateTime.Today.AddHours(10).AddMinutes(12).
            ToUniversalTime(), _
        Key .[End] = DateTime.Today.AddHours(11).AddMinutes(42).
            ToUniversalTime() _
}
appointments.Add(app2)
In C#:
ObservableCollection<Appointment> appointments =
    new ObservableCollection<Appointment>();
Appointment app1 = new Appointment()
{
    Id = "t1",
    OwningResourceId = "own1",
    OwningCalendarId = "cal1",
    Subject = "Appointment 1",
    Description = "My first appointment",
    // Convert the date to universal time, because a time zone is not set
    // in this snippet
    Start = DateTime.Today.AddHours(9).AddMinutes(12).ToUniversalTime(),
    End = DateTime.Today.AddHours(11).AddMinutes(42).ToUniversalTime()
};
appointments.Add(app1);
Appointment app2 = new Appointment()
{
    Id = "t2",
    OwningResourceId = "own1",
    OwningCalendarId = "cal1",
    Subject = "Appointment 2",
    Description = "My second appointment",
    // Convert the date to universal time, because a time zone is not set
    // in this snippet
    Start = DateTime.Today.AddHours(10).AddMinutes(12).ToUniversalTime(),
    End = DateTime.Today.AddHours(11).AddMinutes(42).ToUniversalTime()
};
appointments.Add(app2);
Note that the two appointments' resource id and the calendar id are the same as the resource and calendar defined in the previous step.
Find the main grid in the XAML page or the page contructor if you are going to use the code-behind and add create a ListScheduleDataConnector. Attach the list of resources, calendars and appointments to it:
In XAML:
<ig:ListScheduleDataConnector x:Name="dataConnector" />In Visual Basic:
Dim dataConnector As New ListScheduleDataConnector()
dataConnector.ResourceItemsSource = resources
dataConnector.ResourceCalendarItemsSource = calendars
dataConnector.AppointmentItemsSource = appointments
In C#:
ListScheduleDataConnector dataConnector =
    new ListScheduleDataConnector();
dataConnector.ResourceItemsSource = resources;
dataConnector.ResourceCalendarItemsSource = calendars;
dataConnector.AppointmentItemsSource = appointments;
Create the xamScheduleDataManager and bind the DataConnector property to the data connector. Create one CalendarGroup in the collection CalendarGroups. InitialCalendarIds property can contain comma separated values specifying the calendars to be shown. The format is owningResourceId[calendarId] or just owningResourceId if the primary calendar is the display target.
Ex: InitialCalendarIds=“own2, own1[cal1]”
In XAML:
<ig:XamScheduleDataManager x:Name="dataManager"
             DataConnector="{Binding ElementName=dataConnector}">
     <ig:XamScheduleDataManager.CalendarGroups>
         <ig:CalendarGroup InitialCalendarIds="own1[cal1]"/>
     </ig:XamScheduleDataManager.CalendarGroups>
</ig:XamScheduleDataManager>
Create a calendar group and set the initial calendar:
In Visual Basic:
Dim dataManager As New XamScheduleDataManager()
dataManager.DataConnector = dataConnector
Dim calGroups As CalendarGroupCollection = _
    dataManager.CalendarGroups
Dim calGroup As New CalendarGroup()
calGroup.InitialCalendarIds = "own1[cal1]"
calGroups.Add(calGroup)
In C#:
XamScheduleDataManager dataManager = new XamScheduleDataManager();
dataManager.DataConnector = dataConnector;
CalendarGroupCollection calGroups = dataManager.CalendarGroups;
CalendarGroup calGroup = new CalendarGroup();
calGroup.InitialCalendarIds = "own1[cal1]";
calGroups.Add(calGroup);
Note: Resources may have more than one calendars associated with them, so we are specifying which calendar is to be used. If you do not specify a calendar the primary for the current user will be used.
Finally create a xamSchedule DayView, attach the data manager to it and add it to the "PageRoot" grid named in step 4:
In XAML:
<ig:XamDayView x:Name="dayView"
DataManager="{Binding ElementName=dataManager}" />
In Visual Basic:
Dim dayView As New XamDayView()
dayView.DataManager = dataManager
Me.PageRoot.Children.Add(dayView)
In C#:
XamDayView dayView = new XamDayView();
dayView.DataManager = dataManager;
this.PageRoot.Children.Add(dayView);
Save and run the application. Scroll down the view to find the appointments you just created.
