
This topic explains how to localize the ASP.NET AJAX controls to any language.
Infragistics provides control localizations in English and Japanese. Other languages can be added by creating a custom satellite assembly and installing it in the GAC.
The steps below create a satellite assembly for the German (Switzerland) de-CH culture. The steps can be used for any culture as long as "de-CH" is replaced with a valid culture code. The example uses the WebDataGrid, but the same approach applies to any Ultimate UI for ASP.NET AJAX control.
The Ultimate UI for ASP.NET product should be installed.
In order to access the product source code, you will need an Infragistics account with the ASP.NET product registered under that account.
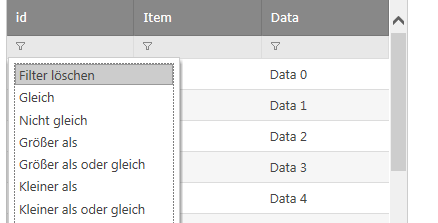
The following screenshot is a preview of the final result.
Create a new folder called Localization. Putting all of the files in one place will simplify the command line steps.
Download the source code for the Ultimate UI for ASP.NET product from the Keys and Downloads section of the Infragistics website.
Copy the WebDataGridStrings_runtime.resx file into the Localization folder created in step 1. This file can be found in the source code under the Infragistics.Web.UI/Resources folder.
Copy the Infragistics4.Web.v23.1.dll file into the Localization folder. This file can be found in the product installation folder (defaults to C:\Program Files (x86)\Infragistics\2023.1\ASP.NET\CLR4.0\Bin).
Open the Localization folder in Windows Explorer.
Make a copy of the WebDataGridStrings_runtime.resx file and rename that copy to WebDataGridStrings_runtime.de-CH.resx.

Open WebDataGridStrings_runtime.de-CH.resx in Visual Studio or another editor and provide translations for the strings. For the filter dropdown options, translate all strings starting with LS_FilterRule_ and followed by the rule name (ex. LS_FilterRule_After, LS_FilterRule_Before, LS_FilterRule_Equals).
Run the Visual Studio Command Prompt as an administrator.

Navigate to the Localization folder that you created in step 1 with the cd command.
cd C:\Localization
Once in the Localization directory, create a StrongName.key file in the Localization folder by extracting the public key that was used to sign the Infragistics4.Web.v23.1.dll assembly. You will use this key file to delay sign the satellite assembly.
sn -e Infragistics4.Web.v23.1.dll StrongName.key
Create a WebDataGridStrings_runtime.de-CH.resources file in the Localization folder.
Resgen WebDataGridStrings_runtime.de-CH.resx

Create a Infragistics4.Web.v23.1.resources.dll file in the Localization folder, which is the satellite assembly.
Al.exe /t:lib /embed:WebDataGridStrings_runtime.de-CH.resources,Infragistics.Web.UI.Resources.WebDataGridStrings_runtime.de-CH.resources /culture:de-CH /out:Infragistics4.Web.v23.1.resources.dll /template:Infragistics4.Web.v23.1.dll /keyf:StrongName.key /delay+

Add strong name verification to the satellite assembly. This will allow you to install the Infragistics4.Web.v23.1.resources.dll file into the GAC without having it fully signed.
sn -Vr Infragistics4.Web.v23.1.resources.dll
Install the satellite assembly into the GAC.
gacutil -i Infragistics4.Web.v23.1.resources.dll

Open the .aspx page of your website.
Set the Page UICulture and Culture attributes to Auto.
In ASPX:
<%@ Page Language="C#" AutoEventWireup="true" UICulture="Auto" Culture="Auto" CodeFile="Default.aspx.cs" Inherits="_Default" %>Alternatively, this can be set in the web.config file between the <system.web> tags.
Set the ScriptManager EnableScriptGlobalization attribute to true.
In ASPX:
<asp:ScriptManager EnableScriptGlobalization="true" ID="ScriptManager1" runat="server"/>If you are using a computer with a different language than your target language, and want to test that the satellite assembly is working, you can change the language that the browser uses.
The example shown is for Firefox on Windows 7, but this will vary based on OS and browser. For example, in Chrome, access the advanced settings from the top right menu and click on "Language and input settings…". On Windows 8, Internet Explorer will display the Control Panel, where you can set the language preferences.
Access the browser options dialog.

In the "Content" tab under Languages, click on the "Choose…" button.

Click "Add" to add the target language, if it is not already in the list. Move the target language to the top of the list. The top language is the one that will be used.

Close all instances of the browser to apply the language settings.
Now you can test your website in that browser using the preferred language.
Note that if you’ve built the assembly on your development machine and want to deploy it on another one you would need to do one of the following:
Follow the above steps and build the satellite assembly on your server.
Add the satellite assembly to the server’s GAC using the gacutil. If you don’t have Visual Studio installed on the server, you can copy and paste the required files. You could also create an installer to install the satellite assembly into the server’s GAC.