
Annotations are useful for adding extra information to your gauge. There are many reasons why you would add an annotation to your gauge, for example:
to highlight a specific area on your gauge.
to add information that would help the end-user easily understand the scale on your gauge, such as 'Mph' on a Radial gauge that represents a speedometer.
to add a name to your gauge, such as "Infragistics' Fuel Gauge".
This topic assumes that you have a gauge already created. For information on how to create a gauge, see Getting Started with WebGauge.
You can apply a box annotation on your gauge:
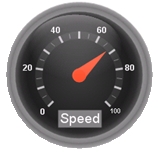
When you save and run your application after completing the following steps, your gauge should look similar to the gauge below.
To create a box annotation to an existing Radial gauge using the Gauge Designer:
In the Gauge Explorer, expand Annotations.
Click Add Annotation… and select New Box Annotation.
In the Properties panel, click Annotations tab. In the Bounds pane, set the following properties:
X — 38
Y — 70
Width — 25
Height — 10
Units — Percent
In the Labels pane of the Annotations tab, set the following property:
Format String — Speed
Click the Appearance tab. In the Brush pane, set the following properties:
Type — Solid
Color — Gray
Click the Labels Appearance tab. In the Brush pane, set the following properties:
Type — Solid
Color — White
In the Font pane of the Labels Appearance tab, set the following properties:
Font — Arial
Size — 14
Type — Point
To create a box annotation on your gauge at design time:
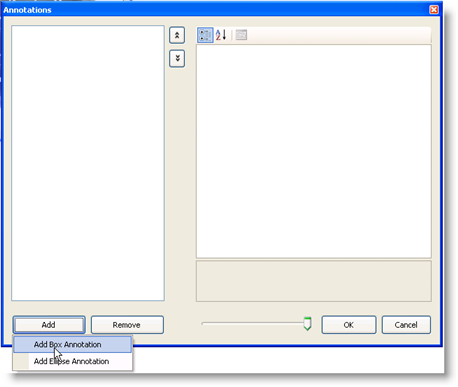
In the Properties window, click the Annotation property. Then, click the ellipsis (…) button to open the Annotations collection editor.
In the Annotations collection editor, click Add, and select Add Box Annotation.
Create a new BrushElement object by clicking the BrushElement property in the right-hand pane. Then, from the drop-down list, select Solid Fill.
Expand the BrushElement property, and set the Color property to Gray.
Expand the Bounds property to adjust the size of the annotation and to position the annotation on your gauge. Set the X property to 38, the Y property to 70, the Width property to 25, the Height property to 10 and the Units to Percent.
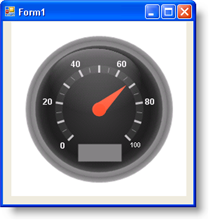
So far if you run the project, the annotation should look similar to the one in the form below.
To add text to the annotation, expand the Label property.
Create a new BrushElement object by clicking the BrushElement property. Then from the drop-down list, select Solid Fill.
Expand the BrushElement property, and set the Color property to White.
Set the FormatString property to "Speed".
Expand the Font property.
Set Size to 14 and Name to Arial.
To add labels to your scales at run time:
Before you start writing any code, you should place using/Imports directives in your code-behind so you don’t need to always type out a member’s fully qualified name.
In Visual Basic:
Imports Infragistics.UltraGauge.Resources
In C#:
using Infragistics.UltraGauge.Resources;
Create the load event.
Create instances of the classes:
In Visual Basic:
Dim boxAnnotation1 As New BoxAnnotation()
Dim solidFillBrushElement1 As New SolidFillBrushElement()
Dim solidFillBrushElement2 As New SolidFillBrushElement()
In C#:
BoxAnnotation boxAnnotation1 = new BoxAnnotation();
SolidFillBrushElement solidFillBrushElement1 = new SolidFillBrushElement();
SolidFillBrushElement solidFillBrushElement2 = new SolidFillBrushElement();
Set the following the Bound properties:
X — 38
Y — 70
Width — 25
Height — 10
Units — Percent
In Visual Basic:
boxAnnotation1.Bounds = New System.Drawing.Rectangle(38, 70, 25, 10)
boxAnnotation1.BoundsMeasure = Infragistics.UltraGauge.Resources.Measure.Percent
In C#:
boxAnnotation1.Bounds = new System.Drawing.Rectangle(38, 70, 25, 10);
boxAnnotation1.BoundsMeasure = Infragistics.UltraGauge.Resources.Measure.Percent;
Set the following the Annotation color properties:
Type — Solid
Color — Gray
In Visual Basic:
solidFillBrushElement1.Color = System.Drawing.Color.Gray
boxAnnotation1.BrushElement = solidFillBrushElement1
In C#:
solidFillBrushElement1.Color = System.Drawing.Color.Gray;
boxAnnotation1.BrushElement = solidFillBrushElement1;
Set the following the Font color properties:
Type — Solid
Color — White
In Visual Basic:
solidFillBrushElement2.Color = System.Drawing.Color.White
boxAnnotation1.Label.BrushElement = solidFillBrushElement2
In C#:
solidFillBrushElement2.Color = System.Drawing.Color.White;
boxAnnotation1.Label.BrushElement = solidFillBrushElement2;
Set the following the Font properties:
Font — Arial
Size — 14
Type — Point
In Visual Basic:
boxAnnotation1.Label.Font = New System.Drawing.Font("Arial", 14.0F)
In C#:
boxAnnotation1.Label.Font = new System.Drawing.Font("Arial", 14F);
Set the following the Format string to Speed:
In Visual Basic:
boxAnnotation1.Label.FormatString = "Speed"
In C#:
boxAnnotation1.Label.FormatString = "Speed";
Add the annotation to your gauge.
In Visual Basic:
me.UltraGauge1.Annotations.Add(boxAnnotation1)
In C#:
this.ultraGauge1.Annotations.Add(boxAnnotation1);