
Labels are numeric or text values that are associated with the values of the scale. You need to add labels to a gauge in order to represent values on the scale.
The next step after adding labels to your gauge is to Add a Needle Marker to a Gauge.
You can add labels to your scale:
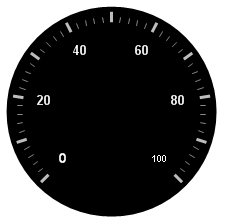
When you save and run your application after completing the following steps, your form should look similar to the form below.
To add labels to your scales using the Gauge Designer:
In the Gauge Explorer, expand Scale.
Select Labels.
In the Properties panel, click the Labels Layout tab. In the Orientation pane, set the following properties:
Extent — 65
Orientation — Horizontal
In the Formatting pane of the Labels Layout tab, set the following properties:
Frequency — 20.00
Span Max — 18
Click the Labels Appearance tab. In the Brush pane, set the following properties:
Type — Solid
Color — White
In the Font pane of the Labels Appearance tab, set the following properties:
Font — Arial
Size — 14
Type — Pixel
Style — Bold
You can see the labels applied to your Radial gauge in the interactive preview area.
To add labels to your scales at design time:
In the Scales collection editor, with a Scale selected, expand the Labels property.
Click the BrushElement property. Then, from the drop-down list, select Solid Fill.
Expand the BrushElement property, and set the Color property to White.
Set the Extent property to 65.
Set the Frequency property to 20\.
Expand the Font property, and set the following properties:
Name — Arial
Size — 14
Unit — Pixel
Bold — True
To add labels to your scales at run time:
Add the following steps to the load event.
Create an instance of the class:
In Visual Basic:
Dim mySolidFillBrushElement1 As New SolidFillBrushElement()
In C#:
SolidFillBrushElement mySolidFillBrushElement1 = new SolidFillBrushElement();
Set the following color properties:
Type — Solid
Color — White
In Visual Basic:
mySolidFillBrushElement1.Color = System.Drawing.Color.White
myScale.Labels.BrushElement = mySolidFillBrushElement1
In C#:
mySolidFillBrushElement1.Color = System.Drawing.Color.White;
myScale.Labels.BrushElement = mySolidFillBrushElement1;
Set the following properties:
Font — Arial
Font Size — 14
Font Type — Pixel
Font Style — Bold
Extent — 65
Frequency — 20
Orientation — Horizontal
SpanMaximum — 18
In Visual Basic:
myScale.Labels.Extent = 65
myScale.Labels.Font = _
  New System.Drawing.Font("Arial", 14.0F, _
  System.Drawing.FontStyle.Bold, System.Drawing.GraphicsUnit.Pixel)
myScale.Labels.Frequency = 20
myScale.Labels.Orientation = _
  Infragistics.UltraGauge.Resources.RadialLabelOrientation.Horizontal
myScale.Labels.SpanMaximum = 18
In C#:
myScale.Labels.Extent = 65;
myScale.Labels.Font =
  new System.Drawing.Font("Arial", 14F,
  System.Drawing.FontStyle.Bold, System.Drawing.GraphicsUnit.Pixel);
myScale.Labels.Frequency = 20;
myScale.Labels.Orientation =
  Infragistics.UltraGauge.Resources.RadialLabelOrientation.Horizontal;
myScale.Labels.SpanMaximum = 18;