This topic is designed to show you how to create the TaskPaneTool , and add it to the UltraTaskPaneToolbar . This topic is a continuation of Creating a TaskPane Toolbar (Part 1 of 3).
Now that you have the WinTaskPaneToolbar on your form, you need to add tools to this toolbar. Once we have tools added you can start to assign controls too UltraTaskPane. Here is where the UltraTaskPaneToolbar differs from a normal Toolbar; for the UltraTaskPaneToolbar Tools collection can only contain TaskPaneTool instances. Meaning you cannot assign for example a ButtonTool or Popup Menu Tool to the UltraTaskPaneToolbar, only TaskPaneTools can be placed inside the UltraTaskPaneToolbar.
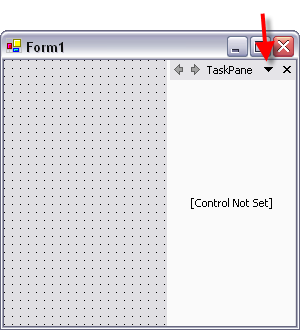
With the form in design view and the newly created TaskPaneToolbar showing, at the top of the UltraTaskPaneToolbar in the header, between the arrow and close button, there is a drop down arrow.

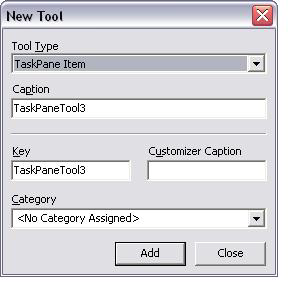
Left clicking on this drop down arrow will display a drop down menu that says Insert New Tool. Left or right click on this menu and you will get a context menu that says Insert New Tool. On this second menu, mouse over and select Insert New Tool. This will cause the New Tool dialog to appear.

This is one way to add a new TaskPaneTool to the UltraTaskPaneToolbar. You will notice that if you click to drop down the Tool Type you only have the TaskPane Item as an option. Again, the UltraTaskPaneToolbar Tools collection can only contain TaskPaneTool instances. For this demonstration, we will just take the default settings, so click Add. You will notice the New Tool dialog does not disappear this allowing you to add more the one TaskPaneTool to the UltraTaskPaneToolbar if you would like. Just to show some things in a little bit, click the Add button again to add a second TaskPaneTool and then click Close on the dialog.
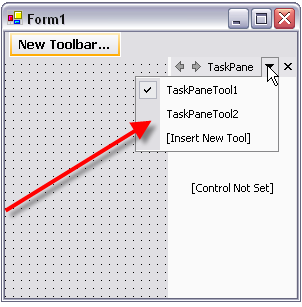
To see the two TaskPaneTools we just added, if you click on the drop down arrow we clicked on before on the UltraTaskPaneToolbar header, you would see our two TaskPaneTools.

On this drop down menu, that shows our two TaskPaneTools you will notice a check mark next to the left of one of the two TaskPaneTools. If you click in this grayish area next to the TaskPaneTool that does not have the check mark you can make that TaskPaneTool have the check mark. This check mark means which TaskPaneTool will be shown as the default tool when the program starts.
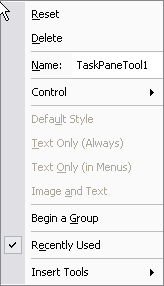
Another thing to notice when on this drop down menu, if you mouse over one of the TaskPaneTools and right click you will get a context menu that has a couple options on it. We will look here at a couple of these options that are useful to know about.

The first being the Delete option, as expected this will delete this instance of the TaskPaneTool from the UltraTaskPaneToolbar.
Another option of importance in the context menu is the Name option. This gives you the option to change the name of TaskPaneTool. Also like the UltraTaskPaneToolbar, the Name is the Key as well, used to identify the TaskPaneTool in the tools collection.
The next option of real importance that we will look at is the Control. This option gives you the ability to select which control will be displayed in the TaskPaneTool. If you mouse over it now you will see none as the only option because we do not have any controls on the form to put inside the TaskPaneTool. We will be talking about this option in the next section when we show how to add controls to the TaskPaneTool.
The final option we are going to bring up is the Begin a Group option. This option has similar effects as it does when used on the PopupMenu Tool. A good example of what this does is the context menu we are looking at for these options. You see the lines in between some of the options; these lines are the division of groups on the context menu.
This is the basics of the TaskPaneTool.