Version

Binding WebDataMenu to an Xml Data Source

Before You Begin

WebDataMenu™ supports binding to an Xml data source to generate a menu structure without writing any code. In order to retrieve your data from the Xml file, you must specify the data bindings for the menu items using the data binding editor.

What You Will Accomplish

You will learn how to bind WebDataMenu to an Xml file and represent the data in a menu-like structure.

Follow these Steps

  1. Create an ASP.NET web page.

  2. Drag a ScriptManager component from the Microsoft® Visual Studio™ toolbox onto the page.

  3. Drag a WebDataMenu control onto the page.

  4. Add an XML File to the project and name it Orders.xml.

  5. Add the following code to Orders.xml:

In XML :

<?xml version="1.0" encoding="utf-8" ?>
<Customers>
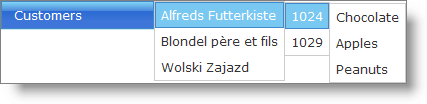
  <Customer CustomerID="ALFKI" CustomerName="Alfreds Futterkiste">
    <Order OrderID="1024">
      <OrderDetail ProductID="1" ProductName="Chocolate" Quantity="10" />
      <OrderDetail ProductID="2" ProductName="Apples" Quantity="20" />
      <OrderDetail ProductID="3" ProductName="Peanuts" Quantity="30" />
    </Order>
    <Order OrderID="1029">
      <OrderDetail ProductID="10" ProductName="Flour" Quantity="100" />
    </Order>
  </Customer>
  <Customer CustomerID="BLONP" CustomerName="Blondel père et fils">
    <Order OrderID="2021">
      <OrderDetail ProductID="4" ProductName="Rigatoni" Quantity="30" />
      <OrderDetail ProductID="5" ProductName="Ricotta" Quantity="10" />
    </Order>
  </Customer>
  <Customer CustomerID="WOLZA" CustomerName="Wolski Zajazd">
    <Order OrderID="2029">
      <OrderDetail ProductID="6" ProductName="Hot Dogs" Quantity="45" />
      <OrderDetail ProductID="7" ProductName="Brown Rice" Quantity="12" />
      <OrderDetail ProductID="8" ProductName="Ketchup" Quantity="100" />
      <OrderDetail ProductID="9" ProductName="Mustard" Quantity="100" />
    </Order>
  </Customer>
</Customers>
  1. Drag an XmlDataSource component onto the page.

  2. Click the XmlDataSource components’s smart tag and select Configure Data Source. The Configure Data Source configuration wizard appears.

image::images\WebDataMenu_Binding_WebDataMenu_to_an Xml_Data_Source_01.png[]

  1. Click Browse… (next to the Data File text box) to specify the XML data file you want to bind to. The Select XML File dialog appears.

images\WebDataMenu Binding WebDataMenu to an Xml Data Source 02.png
  1. Select the Xml file you want to use and click OK. In this case, Orders.xml.

  2. In the Property window for WebDataMenu, set the DataSourceID property to be the id of the XmlDataSource component.

  3. At this point, when you save and run your application your WebDataMenu just shows the items from your Xml file but doesn’t show the data. Your WebForm looks similar to the following image when the menu items are selected:

images\WebDataMenu Binding WebDataMenu to an Xml Data Source 03.png
  1. To specify the data bindings click Edit DataBindings from the WebDataMenu control’s smart tag. This opens the WebDataMenu Designer dialog.

  2. Select Customer node and click the Add Databinding button. This will add the item to the Selected databindings area. Set the TextField property to CustomerName by clicking the dropdown combo in the property window so that CustomerName will be the display text of the item. Similarly, set the ValueField property to CustomerID .

Note
Note:

In addition to CustomerName and CustomerID the dropdown also shows InnerText, Name and Value properties of the XmlNode class providing more options for you to select.

  1. Repeat the above step to add the following data bindings to the Order and OrderDetail items:

Item TextField ValueField

Order

OrderID

OrderID

OrderDetail

ProductName

ProductID

  1. Save and run your application. Your WebDataMenu will look similar to the following image:

images\WebDataMenu Binding WebDataMenu to an Xml Data Source 04.png