Create an Angular application
Learn how to start creating an Angular application when you migrate from WPF to Angular.
Prerequisites
In order to start writing Angular applications, you need to install Node.js and the npm package manager. Node.js is a JavaScript runtime environment that executes JavaScript code outside of a browser. In order to get Node.js, go to nodejs.org. NPM is a package manager similar to the NuGet package manager for .NET. It is installed with Node.js by default. You will also need an IDE. One of the best environments for developing Angular applications is Visual Studio Code. It is free, open source, and runs on every platform. You can get it from code.visualstudio.com.
Create new project
If you are a WPF developer, creating new projects inside of Visual Studio is pretty straight forward. You would just click File -> New Project, select the project type, give it a name and press OK. Since you are going into the Angular world, you want to create a new project inside Visual Studio Code. However, there is no new project option here and that's because Visual Studio Code is file based and not project based. In order to create a new Angular application, we are going to use the command prompt.
First you will need to install the Angular CLI.
npm install -g @angular/cli
Then navigate in the command prompt to the folder where you want your application to be created and execute the following command:
ng new demo-app
We are going to be prompted "Would we like to add Angular routing?". For this demo we will choose NO. Next, we are asked which stylesheet format would we like to use. We are going to stick with the basic CSS for now. It takes a few minutes, but eventually the process will complete and your new application will be created on the disk.
Now we have to change directories to the demo-app folder that was just created and execute a command to open Visual Studio Code.
cd demo-app
code .
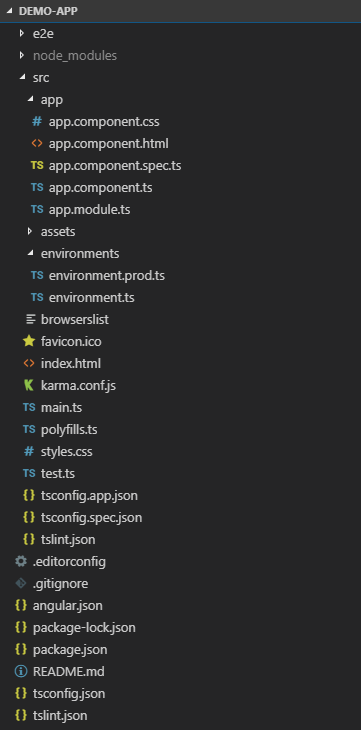
This is going to launch a new instance of Visual Studio Code that contains your Angular application. Now this is the part that is probably the most overwhelming to desktop developers trying to learn Angular - the folder structure.
Project structure
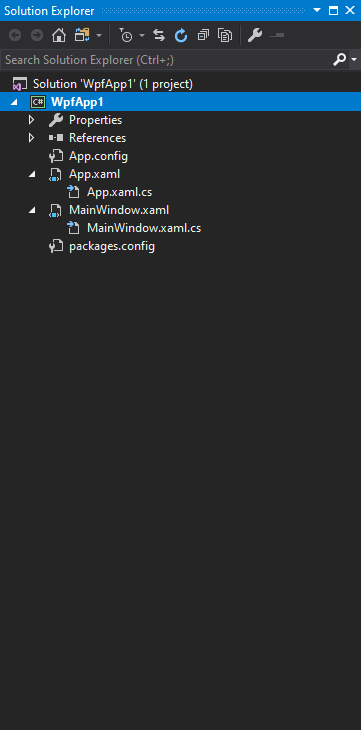
Let's go ahead and take a look at each of these files and see how they relate to a WPF application. The best way to do that is to compare each project side by side. On the left we have our WPF app. On the right we have our Angular app.


It is important to keep in mind that an Angular application is a single page application (SPA) which means there is only one page in the entire app, and that is your index.html. The index.html file could be compared to the App.xaml of the WPF application. They are both global and everything you put there will show up on every single page of your application. The index.html file contains a section <app-root></app-root> which is similar to the StartupUri of the App.xaml file and specifies the first page we want to show when the app launches.
What happens technically is when you navigate to the index.html, the main.ts JavaScript file invokes which loads the AppModule. An Angular application is made up of modules and components. By default, you get a root module and a root component and those are going to be located under the app folder. when the main.ts file invokes, we're going to bootstrap the AppModule, which is in the app.module.ts file in the app folder.
The app module then bootstraps its own AppComponent. The AppComponent is defined in the app.component.ts file and its selector is set to app-root. The AppComponent has its html template defined in the app.component.html file. Basically the <app-root></app-root> section in the index.html page will visualize the content of the app.component.html file.
The main.ts file is similar to the App.xaml.cs file since it is something like a code behind. The app.component.html, which is the default component shown when the application runs, is very similar to the MainWindow.xaml in WPF.
In WPF we have a packages.config file which defines all our dependencies to nuget packages while Angular has a package.json file which contains the dependencies that your application requires to run. The package.json file contains also a section for scripts that you can run in the console when you are testing, starting or building your application.
Let's take a look at the References folder. In WPF we have a References node in our solution that shows all the references that are added to this project. In an Angular application that is actually going to be the nodes_module folder. Coming from WPF, you may be surprised how many dependencies an Angular project has. These are populated by using npm.
Unfortunately, here the similarities end. Let us look at some of the other generated files and folders:
e2e- stands for end-to-end testing and contains integration tests or tests with real-world scenarios like a login process.src- most of the application's code is located here.assets- contains your images or any other assets.environment- contains information about your build environments.favicon.ico- the icon that appears in the browser when you are at your site.karma.conf.js- contains configuration for the unit tests.style.css- stylesheet with styles that are global for your application, it is similar to a resource dictionary defined inApp.xamlin WPF.
Run the application
Now we are ready to run the application, but in Visual Studio Code you cannot just press F5. We are going to open the Visual Studio Code Terminal by clicking in the menu on Terminal -> New Terminal or by pressing Ctrl + Shift + `. In order to run the application, you should execute the following command:
ng serve
After the application is started, you can open it in the browser on the following URL http://localhost:4200/. If you want your app to open automatically in the browser, you should use the following command:
ng serve -o
In this case -o stands for open. Another way to start the application is by using the npm commands:
npm start
You could find those scripts defined in the package.json file and modify the start command by adding the -o option:
  "scripts": {
    "ng": "ng",
    "start": "ng serve -o",
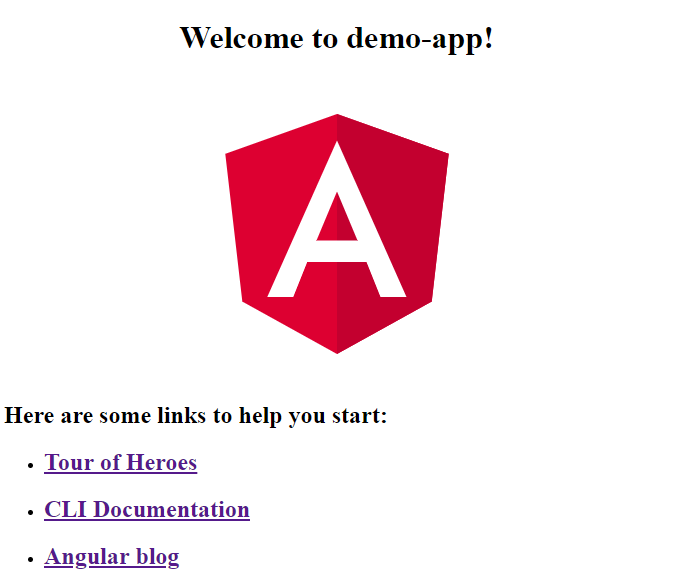
Your first Angular application should look like this:
